I plant seeds and guide growth for content strategies, brands, teams, and also plants. View marketing writing samples at www.angelagilboywrites.com and what's growing at www.growearthy.com. Certified by the Florida Department of Agriculture #48023405
Native to Southern Africa, all varieties of Stapelia succulents thrive in hot, dry areas with sandy soil. Bright, indirect sun or partial sun is ideal for ensuring lots of blooms and healthy green stems. Full sun, especially full afternoon sun in Florida, can turn the stems reddish-brown.
All Stapelia succulents use their large, star-shaped blooms and pungent scent to attract their primary pollinators: flies. Despite their strong aroma, they are cherished by plant lovers for their unusual flowers, heat tolerance, and ease of care.
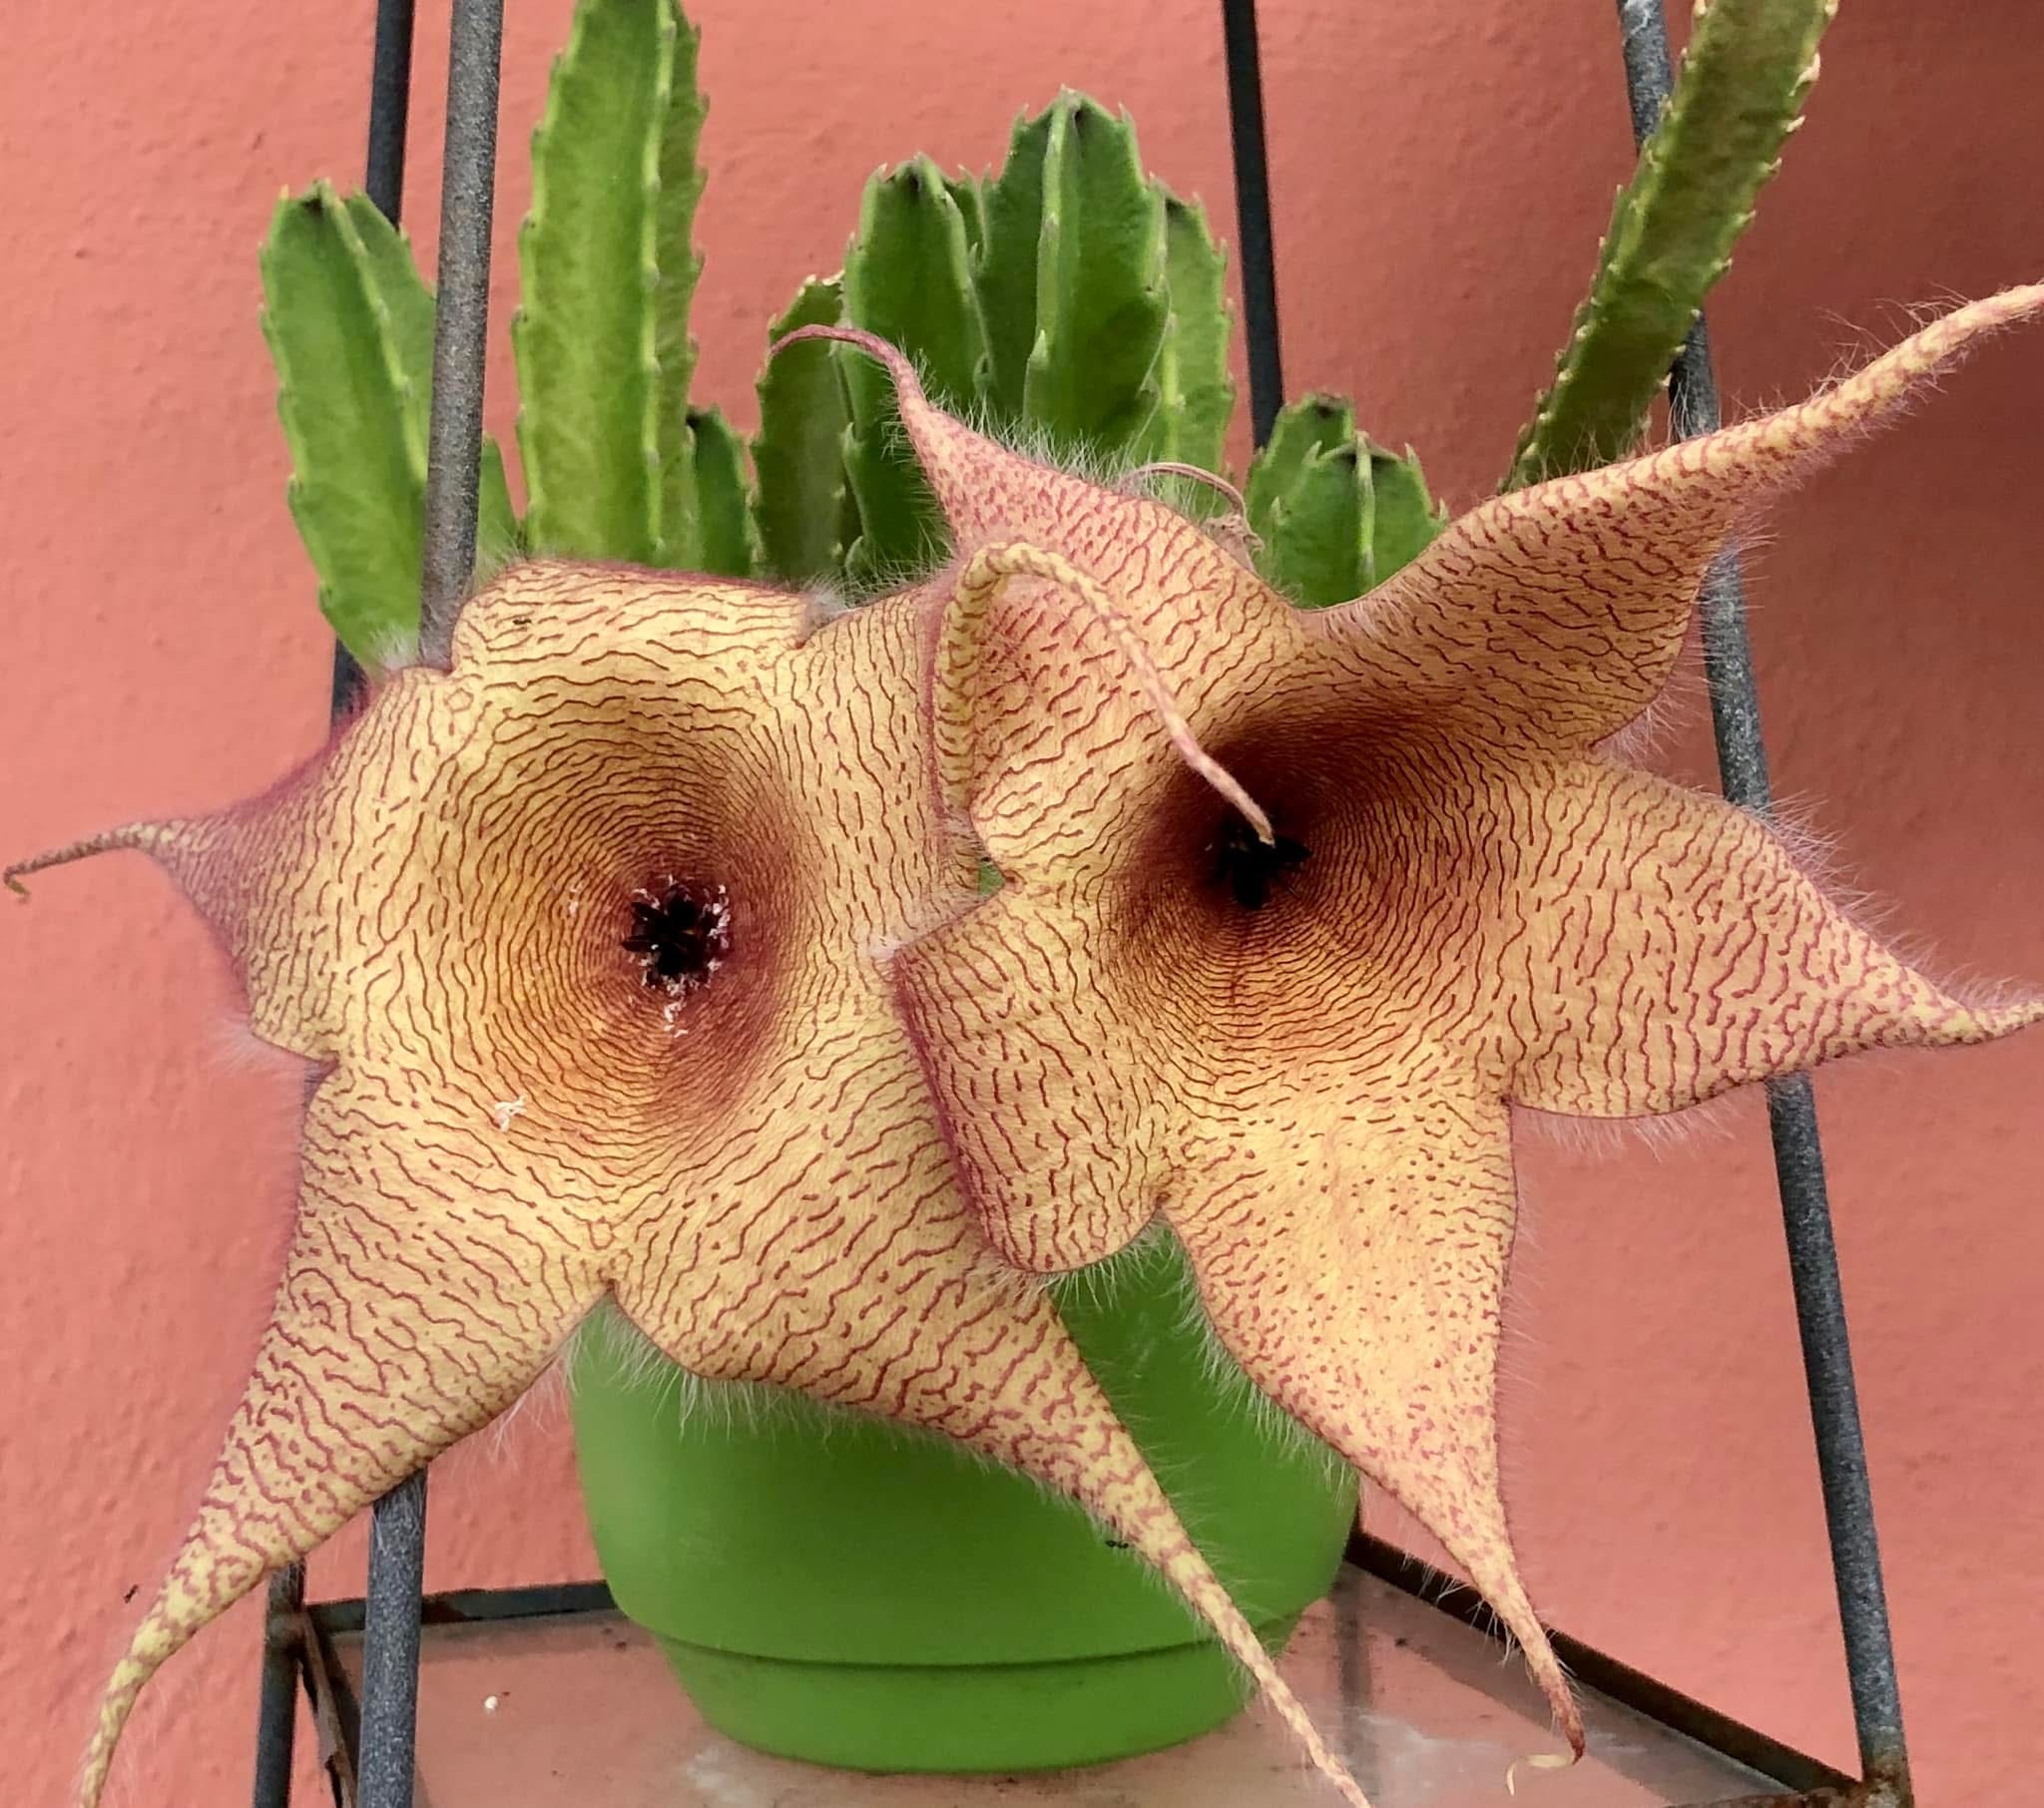
Starfish Cactus (Stapelia gigantea)
Starfish Cactus are named for their large, star-shaped flowers. Like all plants in the Stapelia genus, they are actually succulents, not cacti. The thick, fuzzy green stems have rough points along their edges, but no spikes or prickly thorns.
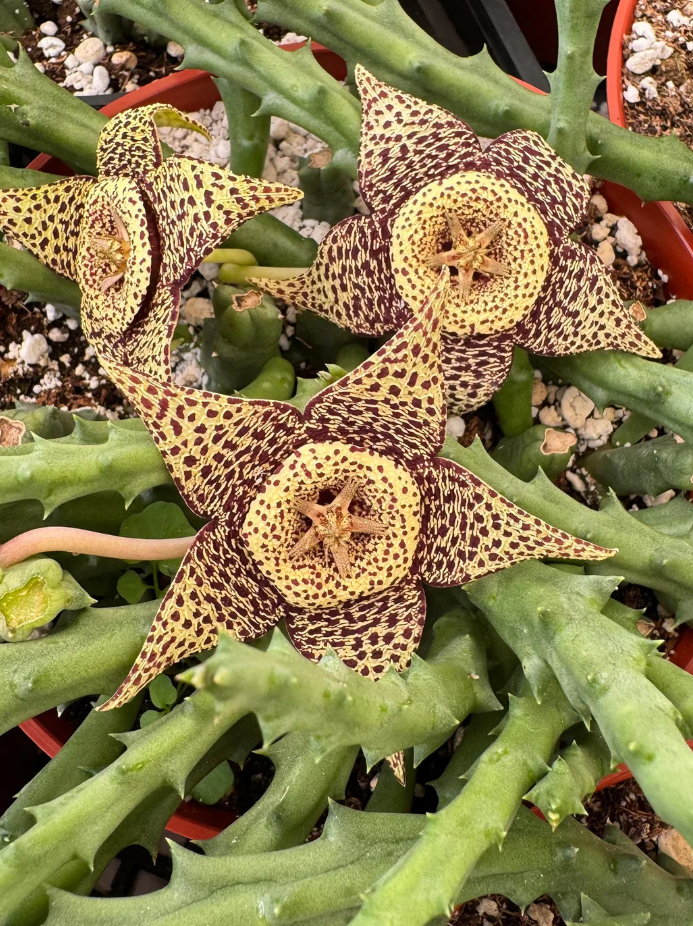
Starfish Flower Cactus (Stapelia orbea variegata)
This species is one of the most widely grown and easy-to-find Stapelia succulents. Its green stems are not as thick as those of other Stapelia varieties. Its flowers are smaller, too, but are vividly colored and last longer once opened.
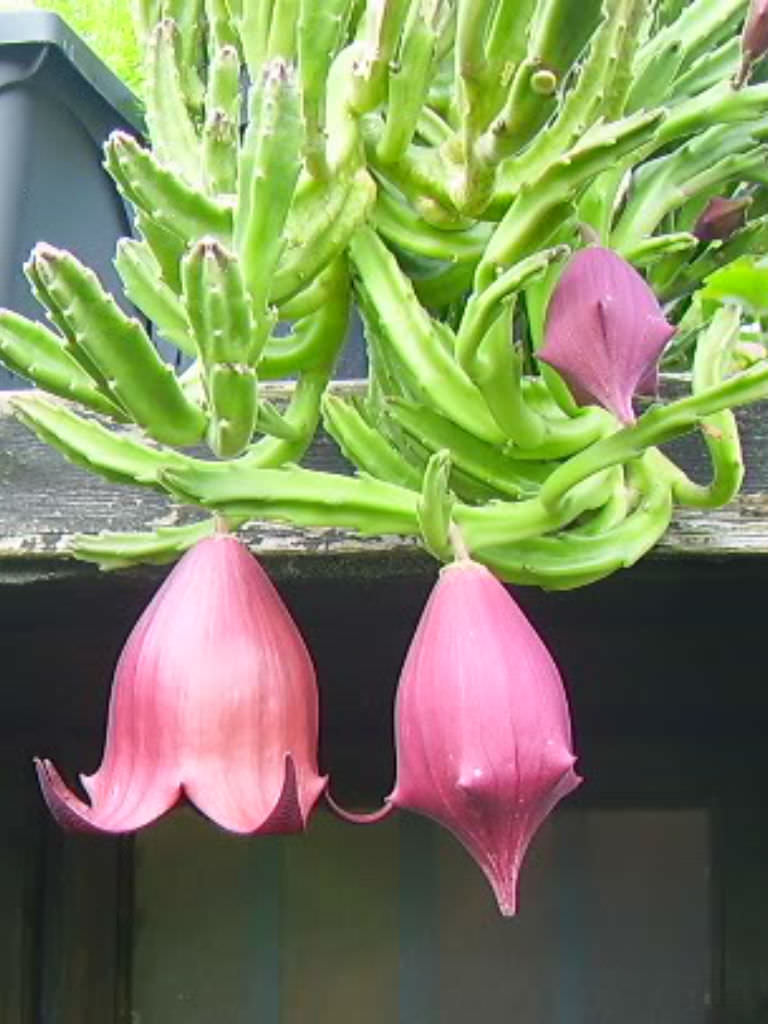
Blackbell Cactus (Stapelia leendertziae)
This species produces drooping, bell-shaped flowers coated in fine, velvety hairs. The blooms resemble the star-shaped flowers of their Stapelia cousins if the bell is turned to face you. They can measure up to 3 inches in length and are a deep maroon color that turns black as the flower wilts.
Caring for Stapelia Succulents
Light: Stapelia thrive in bright, indirect light or partial sun. They can tolerate some direct sun, but full sun all day long will burn them. Select a spot with bright, filtered light and/or either morning or afternoon sun.
Watering: Allow the soil to fully dry out between waterings. Overwatering can lead to black spots on the plant’s stems or limbs and eventually root rot. Its always better to err on the side of underwatering.
Soil: Use a well-draining succulent or cactus mix that prevents water from pooling around the roots. Adding perlite or sand to the mix can help improve drainage. They can be planted directly in the ground if your soil is sandy.
Temperature: Stapelia prefer warm conditions and do best in temperatures between 70-90°F. During the colder months, they should be kept above 50°F to avoid damage.
Bring on the Blooms: To encourage flowering, ensure your Stapelia is receiving enough light and is slightly root-bound. These plants bloom more frequently when they’re slightly constrained in their pots. Use a low-nitrogen cactus fertilizer every 2-3 waterings in spring and summer.
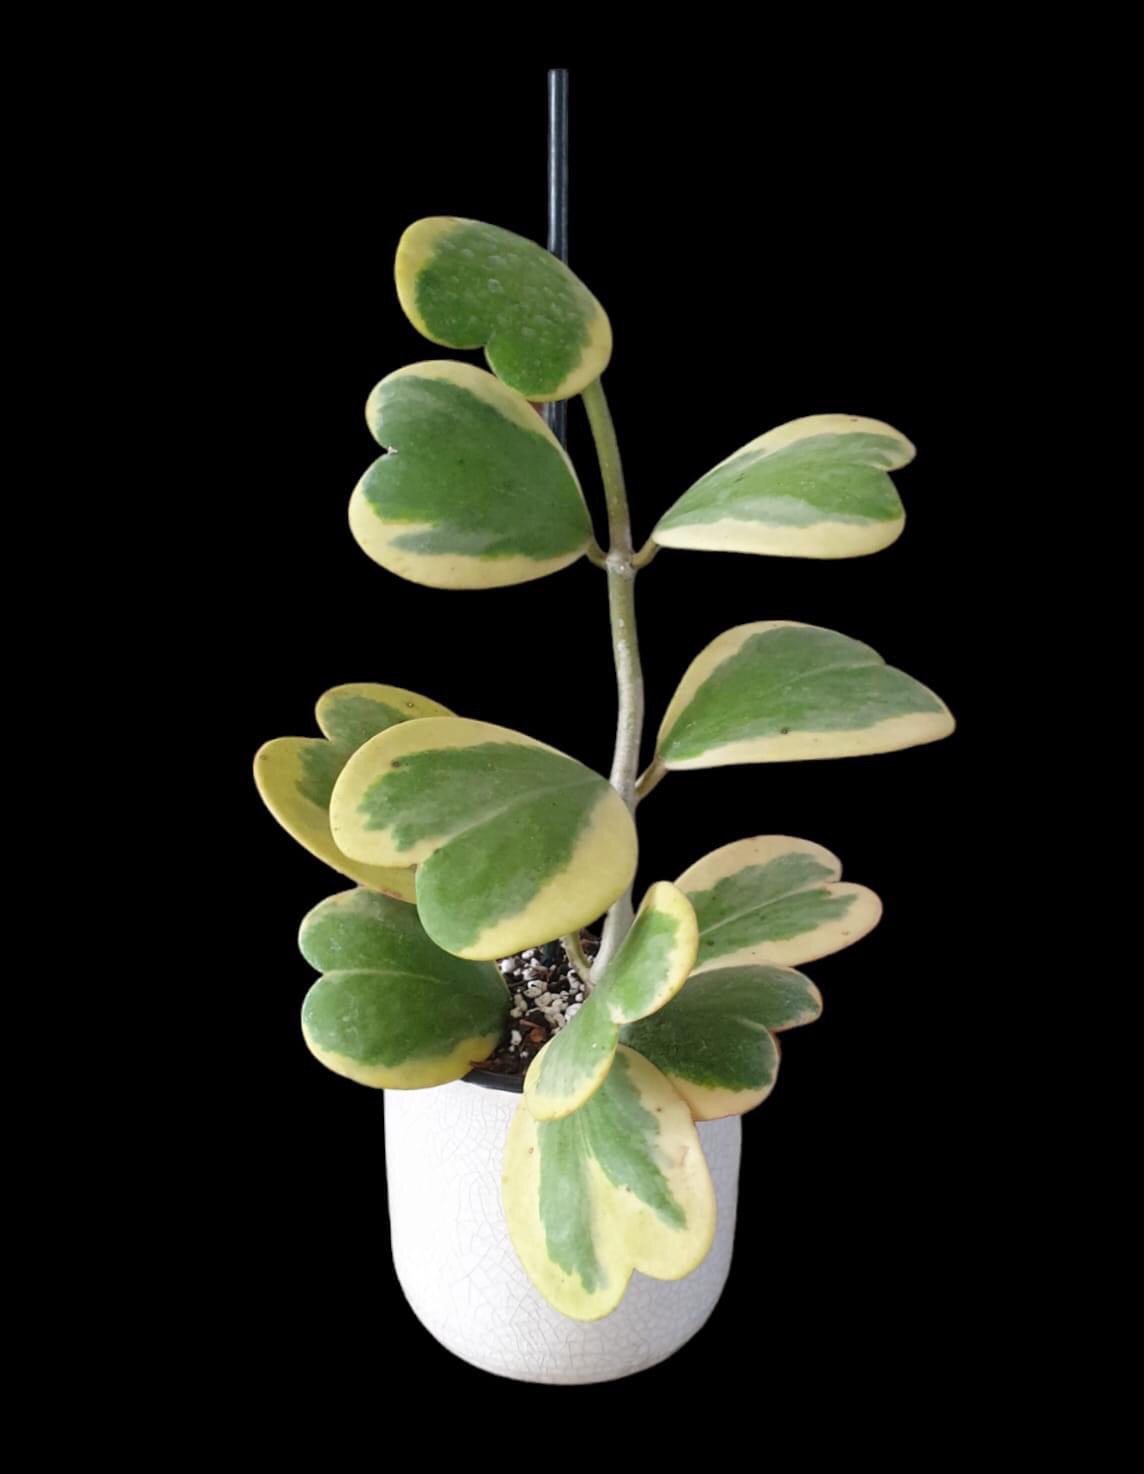
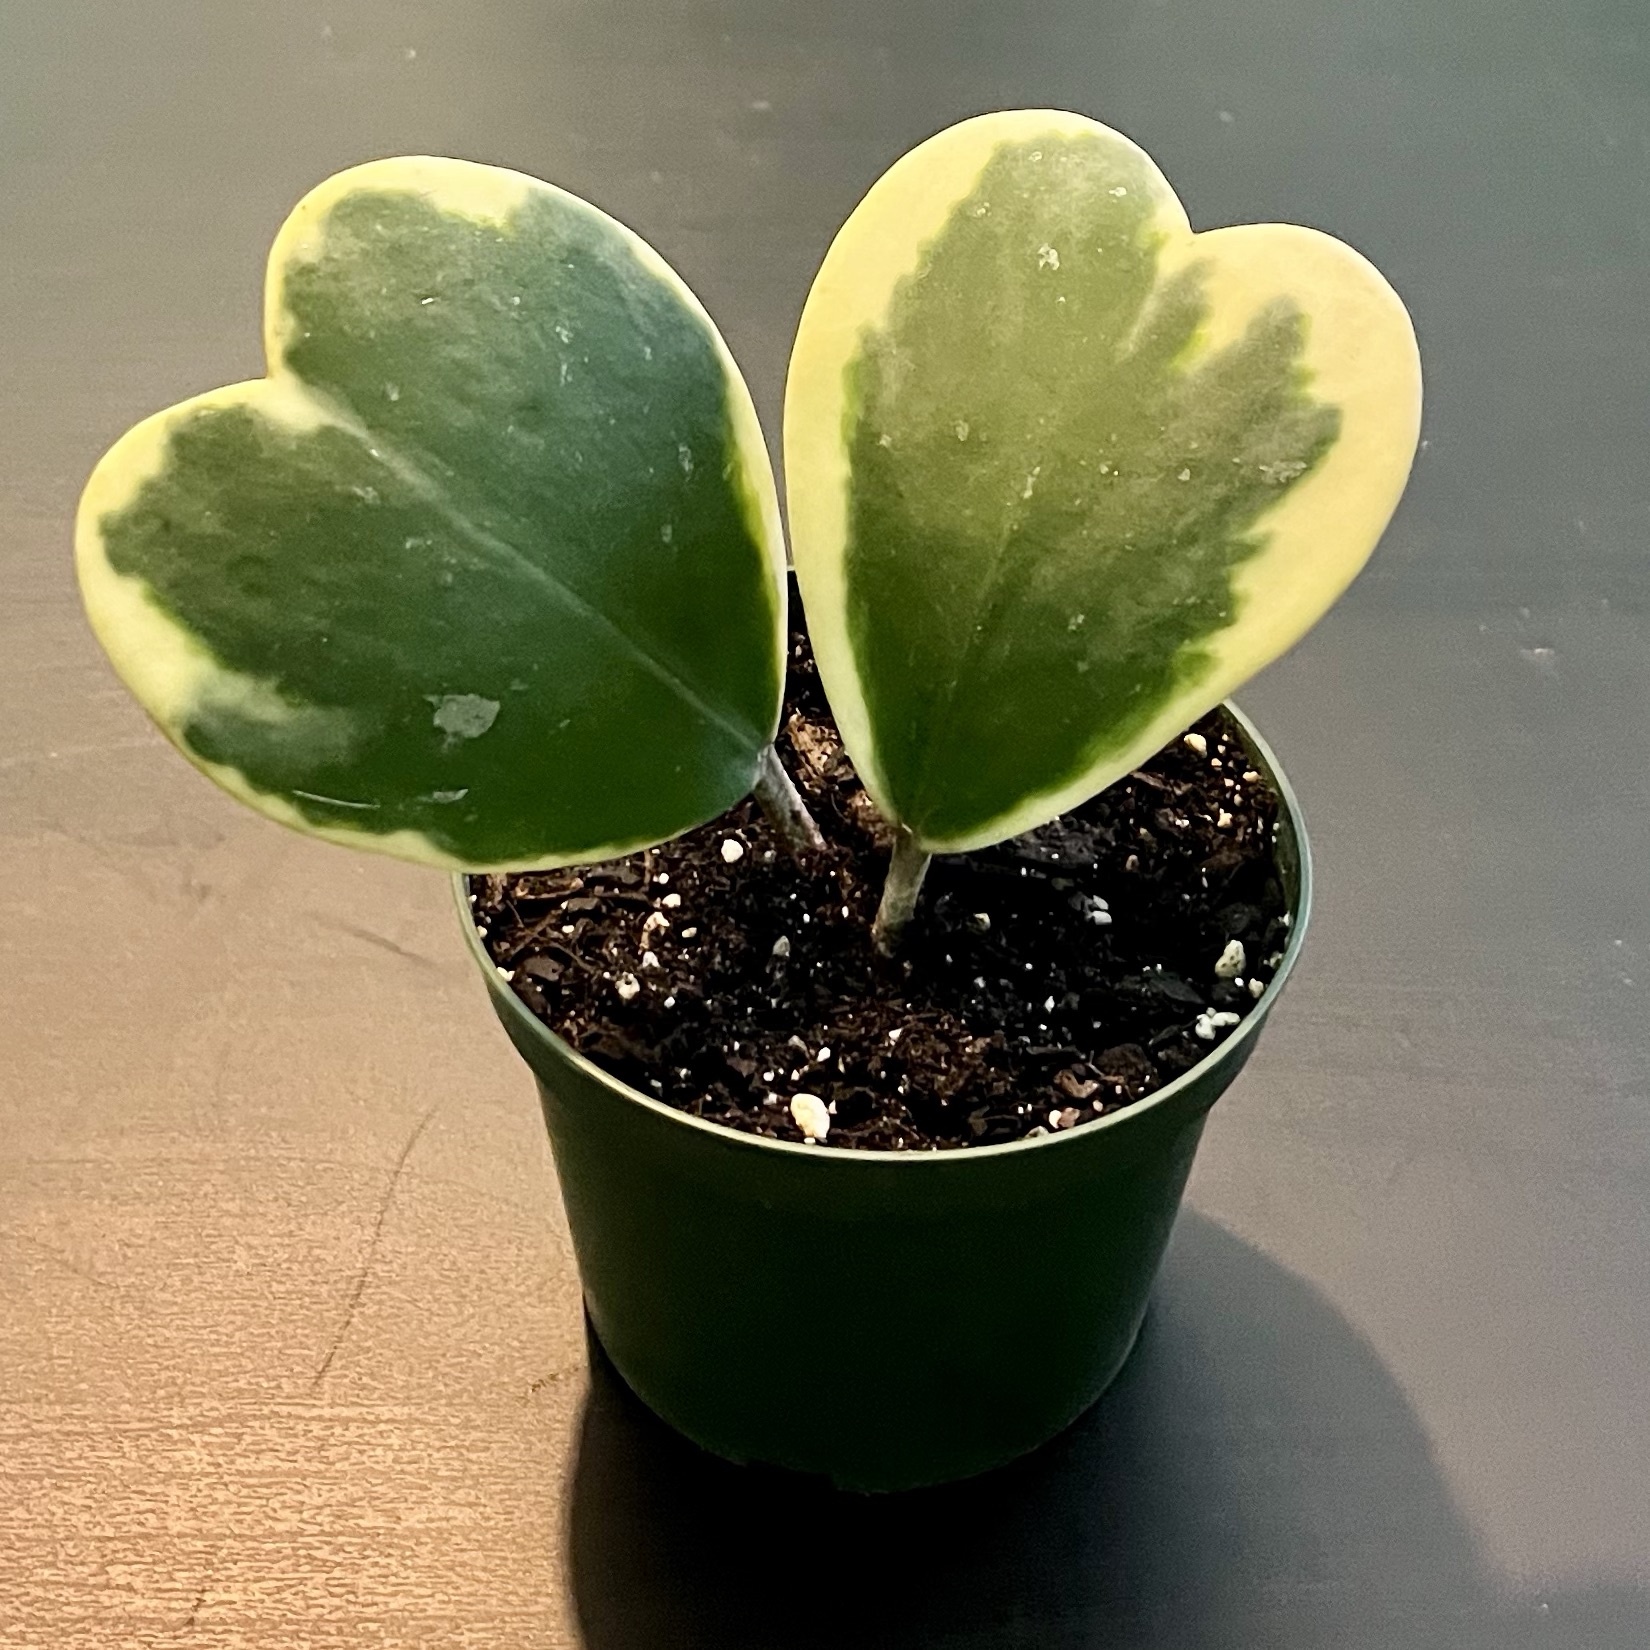
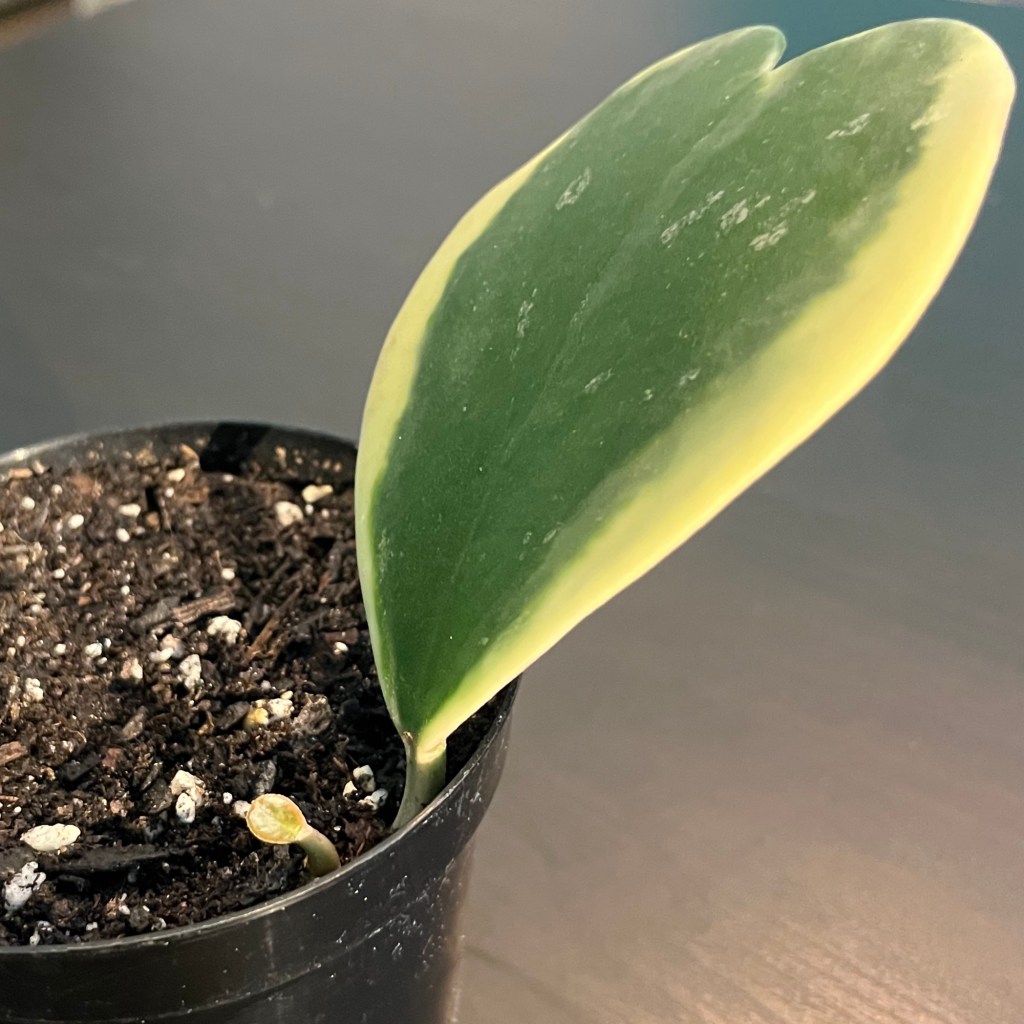
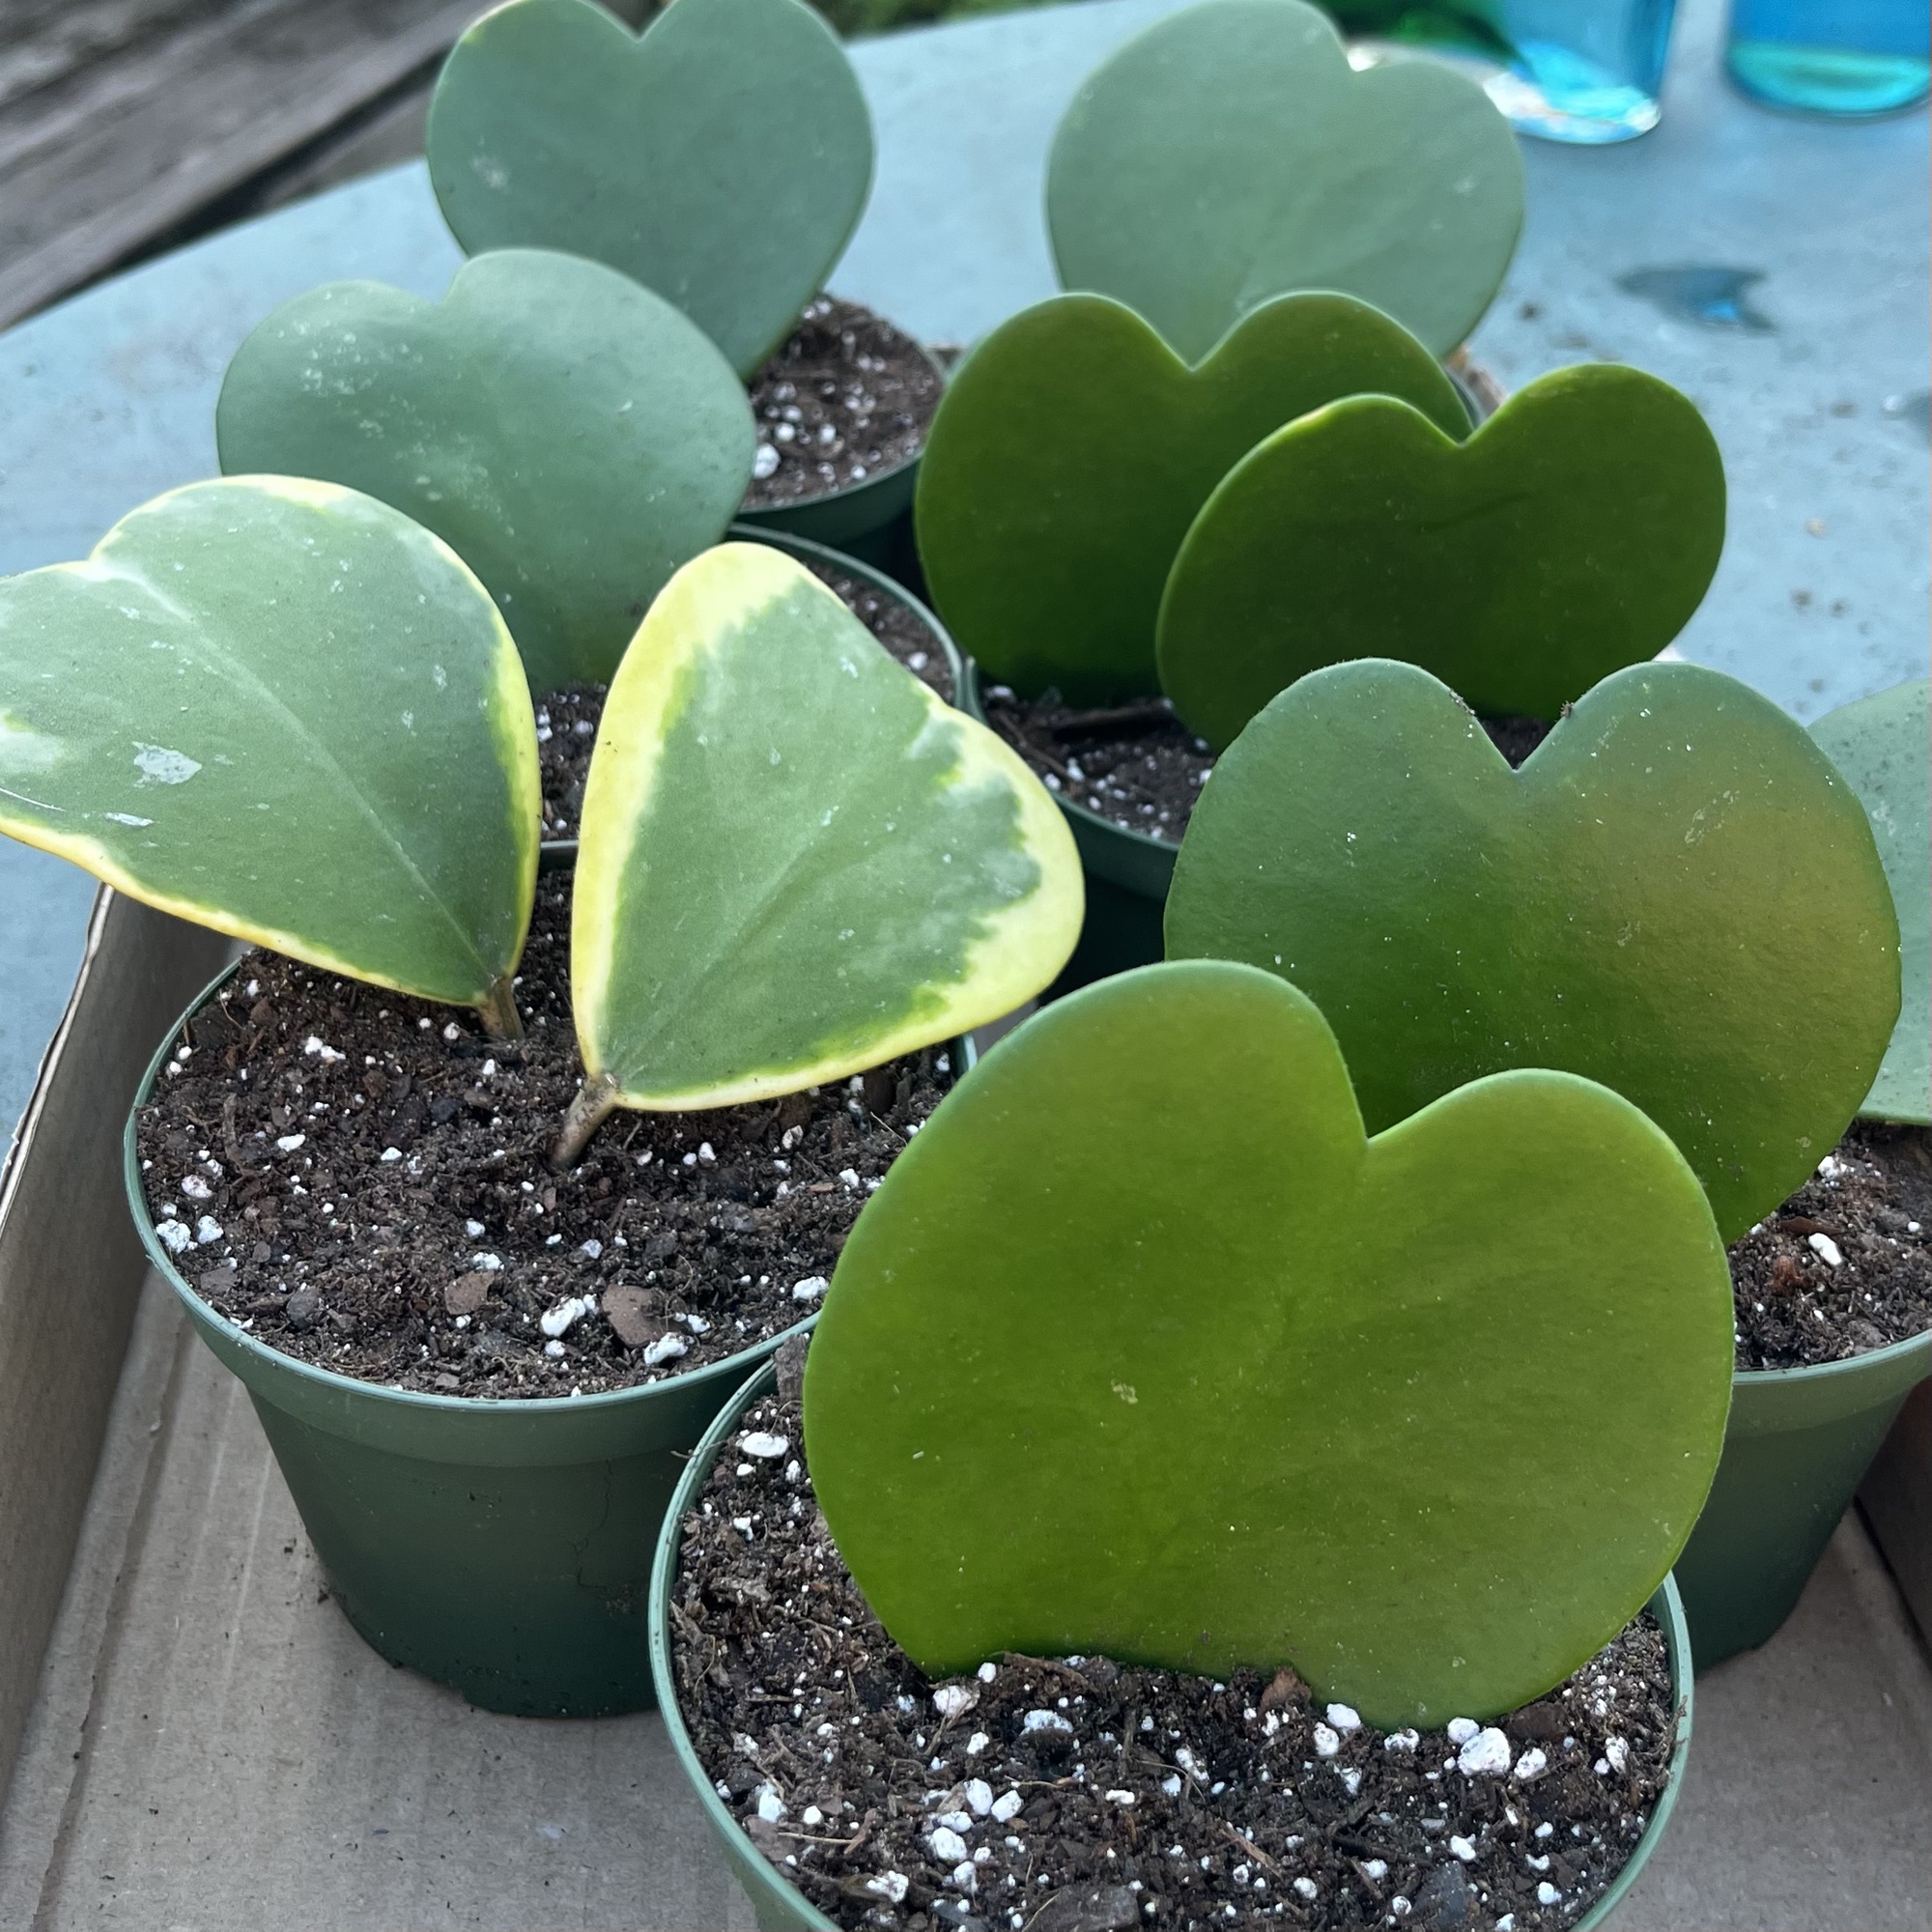
Also known as the sweetheart vine, slow-growing Hoya Kerrii can be variegated (pictured above) or solid green. They are sometimes sold as a single leaf and called a forever heart.
If you’re looking for a plant as charming as it is easygoing, the Hoya Kerrii is a perfect long-term companion. Native to Southeast Asia where it climbs tree trunks in rain forests, Hoya Kerrii thrive in warm, humid environments with bright, indirect light. Its thick, waxy leaves are non-toxic to pets and help to provide the sort of independent, self-resilience many people look for in a plant.
Like true love, Hoya Kerrii grows slowly but thrives when it finds where it truly belongs. It doesn’t need much in terms of care, just light, warmth, and occasional watering. A natural-born tree-hugger, Hoya Kerrii wants to cling tightly to something–a trellis, moss pole, nearby plant, edge of bookcase, or even the wall. It will send out a long, leafless tendril in search of support. Don’t cut this off. Instead, wrap it around something stable or twist it into a circle. When your vine is feeling cozy and secure, you’ll see new leaves followed by beautiful clusters of blooms.
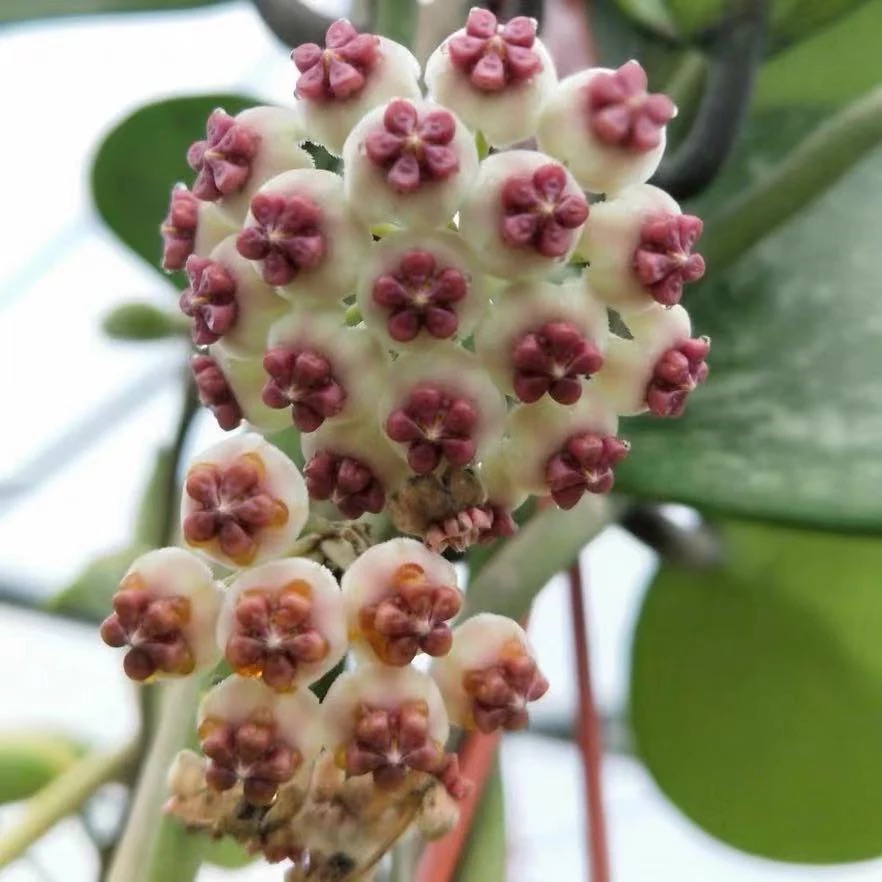
Slow-Motion Fireworks: Star-Shaped Flowers Take Weeks to Form
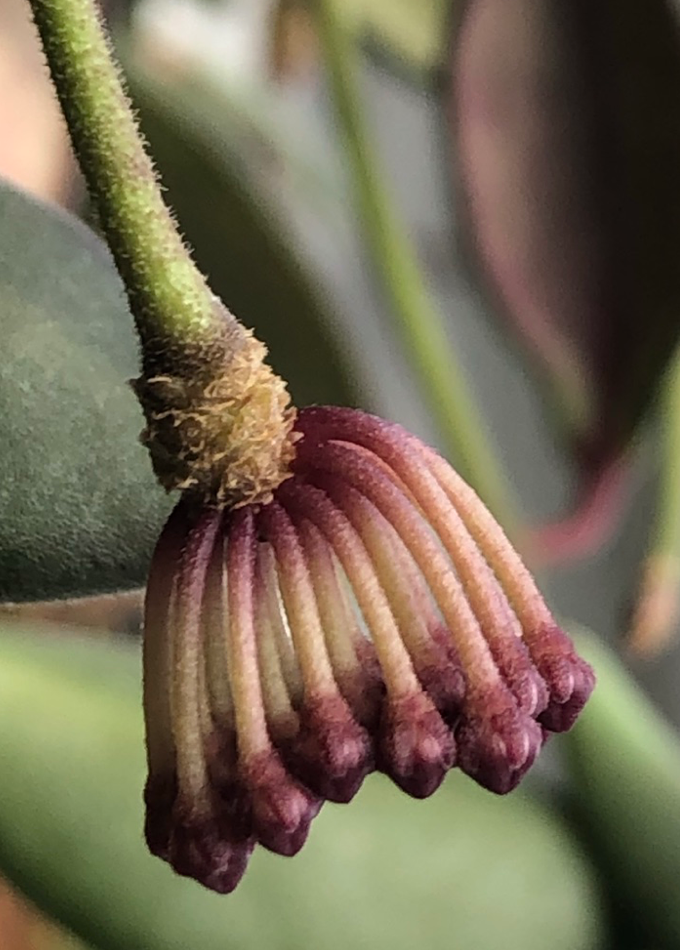
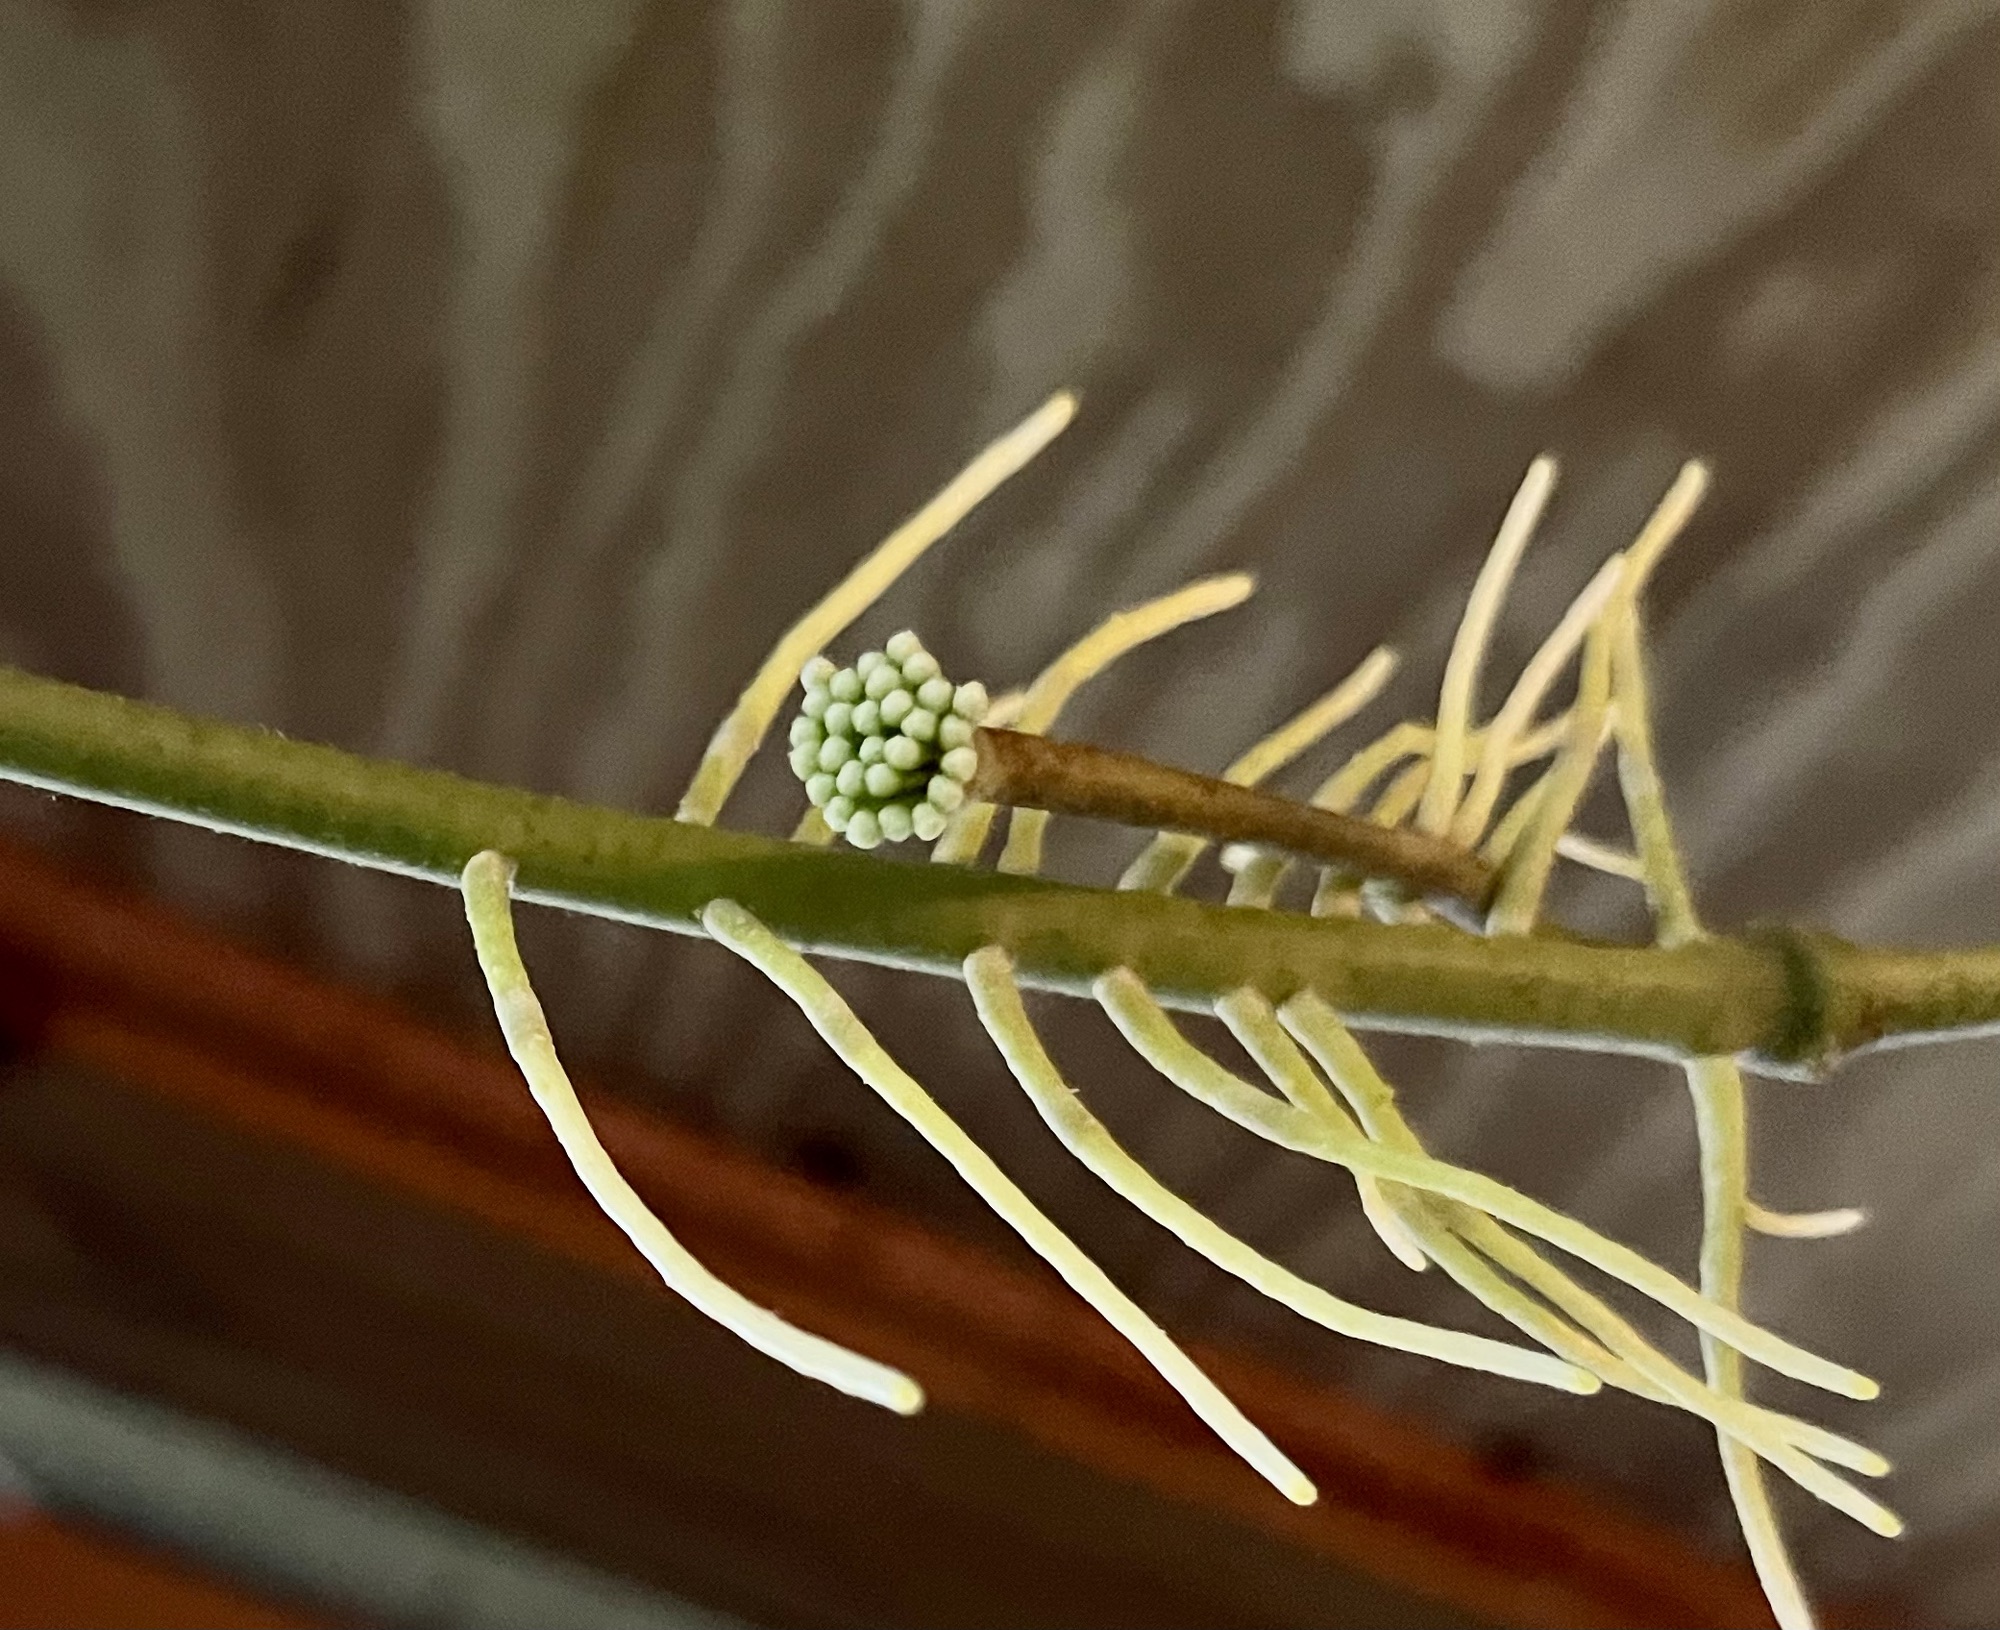
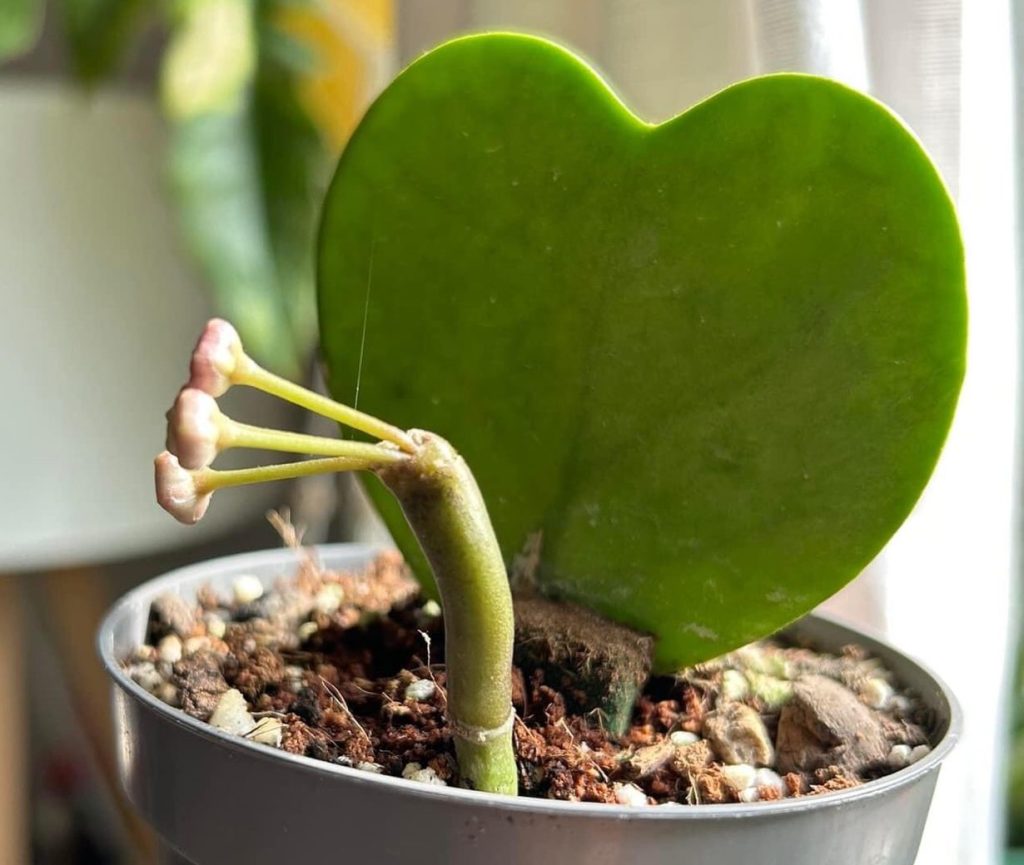
Once you know what a peduncle is, you’re going to want a lot of them. To encourage blooms, find a bright spot and add a trellis for support.
Hoya Kerrii vines typically bloom in the spring or summer if the plant is mature and has well-established roots. Newly rooted cuttings may take 1 to 2 years to bloom, and most single leaf cuttings will never bloom. The flower clusters begin as peduncles and will grow from the vine where it separates to make leaves. Most often, this magic occurs on that wild, searching tendril if it finds the right support. Then, the peduncle buds extend out until they open like fairy umbrellas.
Will My Forever Heart Ever Become a Vine or Bloom?
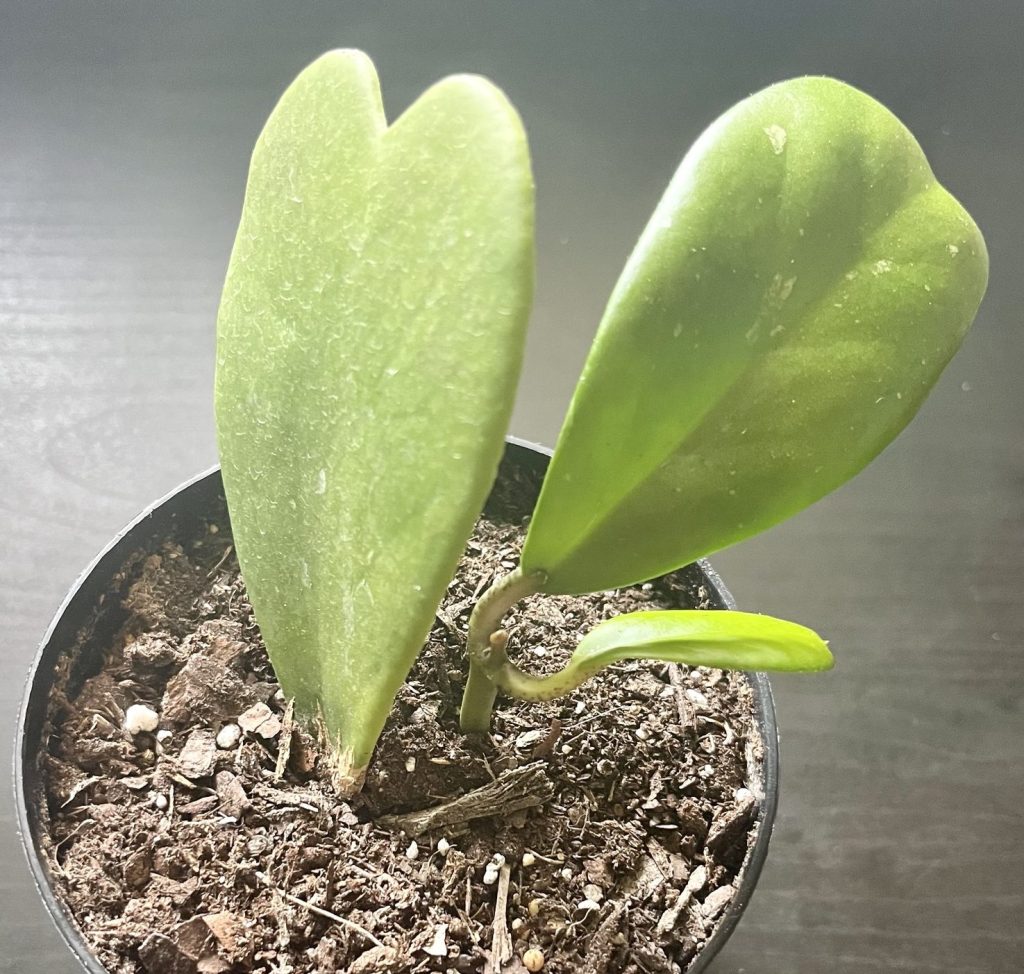
Never say never . . . a single leaf Hoya Kerrii typically lives for 2 to 3 years without making other leaves or flower clusters. The images above are exceptions to the rule.
In most cases, a commercially produced Hoya Kerrii forever heart will remain a single, heart-shaped leaf for a lifespan of 2 to 3 years unless it thirsts to death or is drowned by overwatering. In rare cases, as pictured above, the single leaf cutting includes growth tissue, called a root node, that sends up a new leaf or bloom peduncle. Grow Earthy Hoya Kerrii are clearly labelled and guaranteed to grow as promised.
Single leaf and vining Hoya Kerrii are available at the Grow Earthy farmers market booth. Check market dates here.
Quick Tips for Caring for Hoya Kerri
Light: Find a spot with bright, indirect sunlight. It can tolerate some direct light, but too much can scorch the leaves.
Watering: Allow the soil to dry out completely between waterings. Overwatering is the most common mistake with this plant, so err on the side of caution.
Soil: Use a well-draining succulent mix to prevent water from pooling and causing root rot.
Temperature: Keep your plant in a cozy environment between 65-80°F. It does not like cold drafts or sudden temperature changes.
Humidity: All Hoyas prefer moderate humidity levels. While they can adapt to average indoor conditions, occasional misting or a nearby tray of water can help in drier climates.
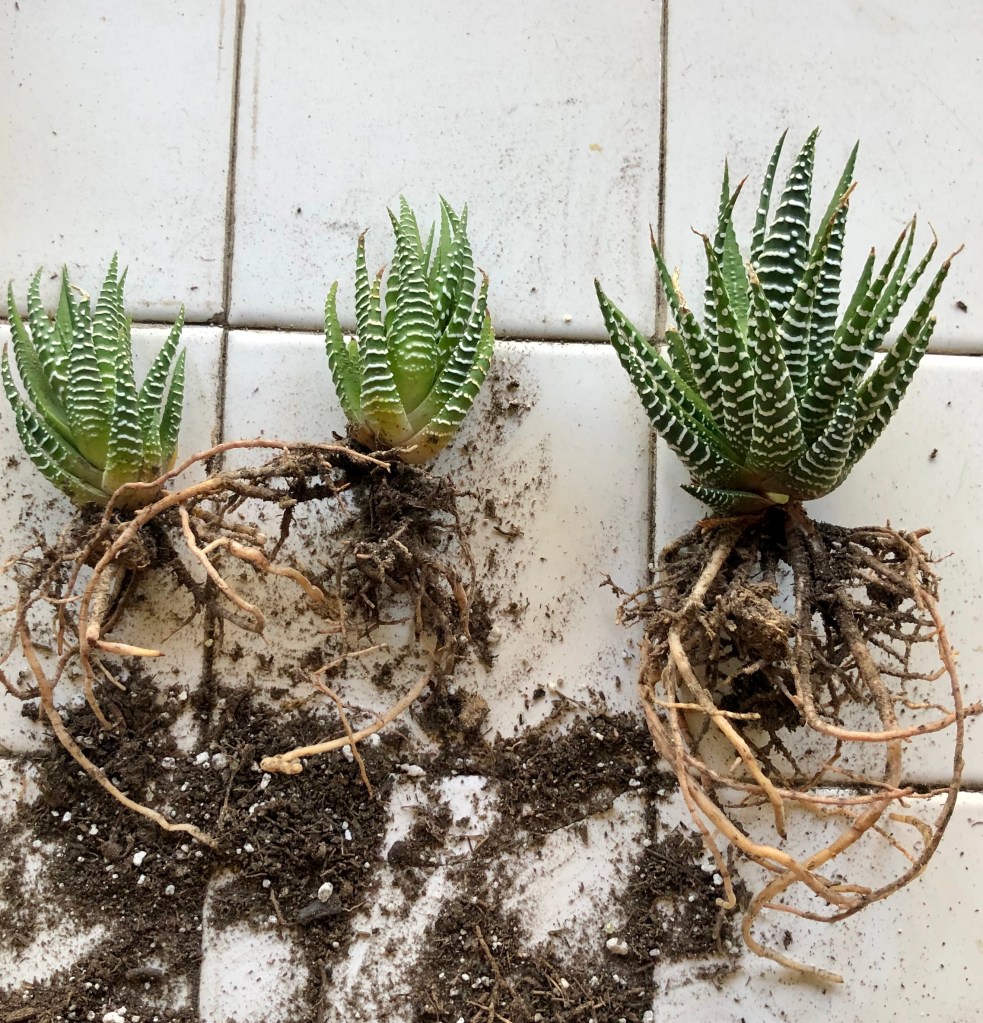
Growth brings changes and often the need for more space. If your plant has outgrown its container, you can move the entire plant to a larger pot or separate the plant at its roots to create new, smaller plants.
Maybe your plant grew little pups or offshoots at its base that are growing bigger. Once the baby plants have reached two-to-three inches in size, you can gently remove them from the parent plant. It may sound difficult, scary, or even a little sad, but separation is best for both the parent and baby plants. Follow the steps below to protect their roots as you give them more space to grow.
Steps for Separating Plants.
Select a plant that is pot-bound or has baby plants at its base.
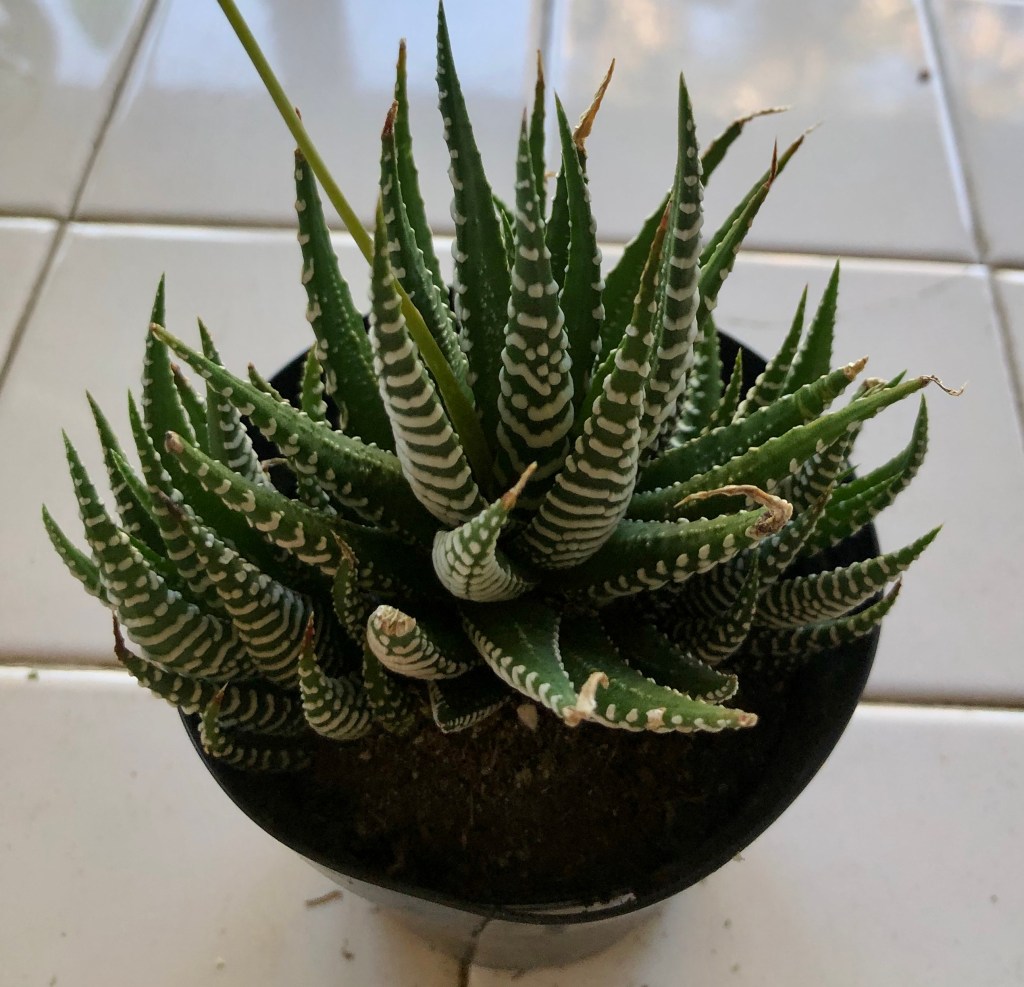
This Haworthia Zebra plant has made two pup plants and is frequently getting brown tips due to overcrowded roots. Its round plastic pot is stretched into an oval from the growth of the new plants.
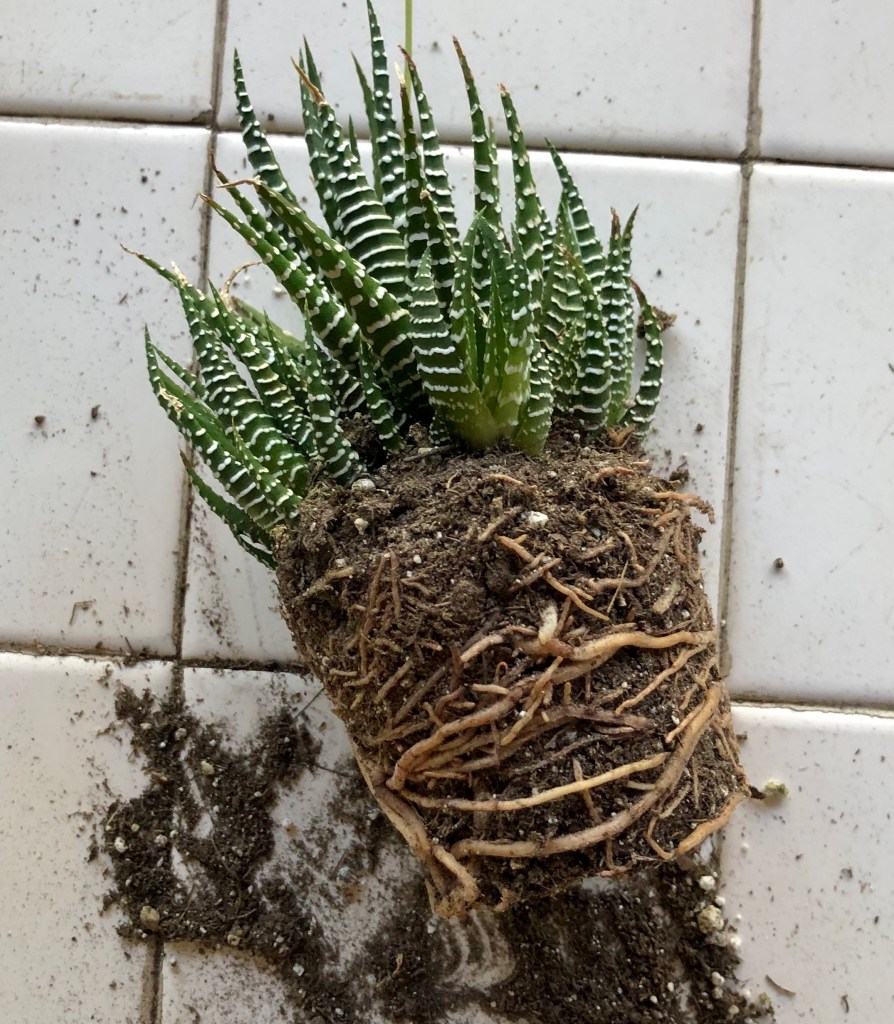
2. Remove the plant from its pot.
Dry roots are easier to separate so wait until the plant’s soil is completely dry. Then, use a small shovel or an old butter knife to carefully loosen the plant’s roots around the inside of the pot. Hold or lay the pot on its side and slide the plant out horizontally. Do not try to pull it upwards or dump it out on its head.
3. Gently shake out the soil and loosen its roots.
Dry soil should shake free from the plants’ roots, making it easy to uncoil tightly wound roots.
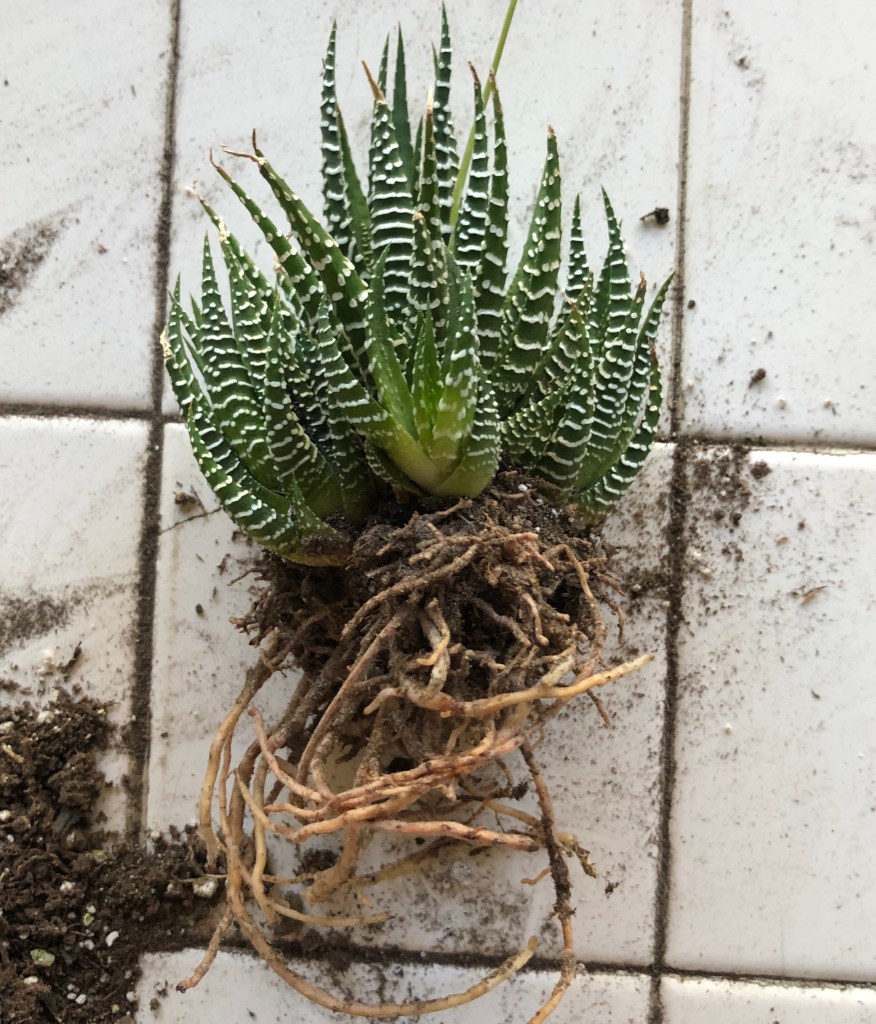
4. Decide which roots belong to each plant and untangle them.
Starting at the base of a pup plant, gently pull it away from the parent plant, untangling its roots to separate them. You can use a small gardening fork but bare fingers work best.
5. Measure the new plants’ roots to find the right sized pots.
The parent plant will have more established roots than the newly removed baby plants. It is best to choose a container that is only slightly larger than the plant’s root base. Fill the bottom of the container with loose gravel before adding soil to help with drainage.
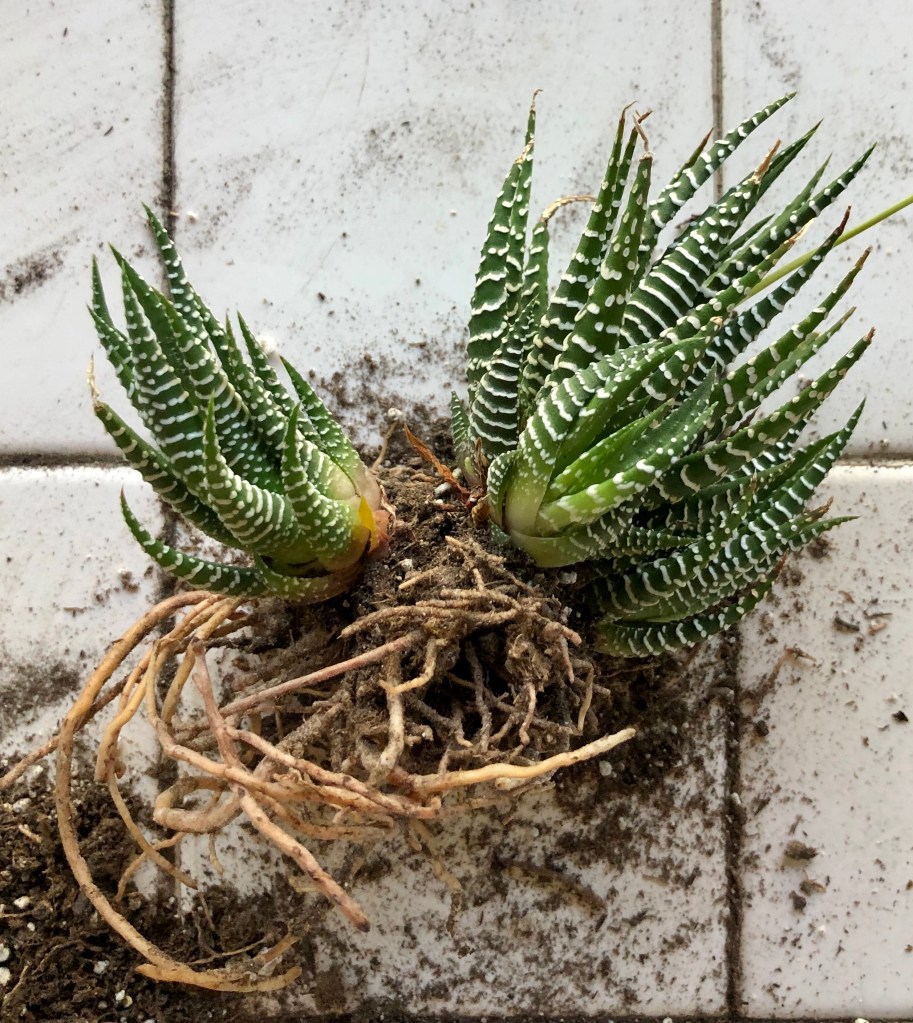
6. Enjoy new healthier, happier plants.
All settled into their new homes and ready to grow bigger and more beautiful. Stop by a market soon and take one home with you. Grow Earthy Event Schedule
Once upon a time, the world fell in love with houseplants. When the pandemic hit, everyone was stuck at home and worried about air quality at the same time. Houseplants started trending, and they haven’t stopped. If you search the Internet for “air-purifying plants,” you’ll find articles listing the same 10-20 houseplants with the same reference source: the NASA Clean Air Study. Snake plants are at the top of most lists, but according to NASA, peace lilies and parlor palms out perform them as air purifiers.
Common Chemicals Currently Sharing Your Air
The NASA study measured 30 plants for their ability to remove six chemicals from the air: benzene, formaldehyde, trichloroethylene, xylene, toluene, and ammonia. Who lives with those? We all do. It’s frightening to read the list of common household products that contaminate our indoor air. Most carpets contain and release all six chemicals tested, along with several others. Wall paint and furniture polish are sources of benzene. Laminate flooring, wrinkle-free fabrics, and permanent markers contain formaldehyde. Read more about these chemicals, also known as VOCs or violate organic compounds, at greenfacts or the environmental protection agency. Or, just move on to the good news: you need more houseplants, many more! It’s not excessive. It’s for your health.
Breathe Easier with Air-Purifying Indoor Plants
The good folks at NASA know that we are not all rocket scientists. Perhaps that’s why the 30 plants included in their study are all fairly easy to grow. To further simplify, I’ve listed the top-performing air-purifying plants that you can oh-so-easily buy at the Grow Earthy booth on these dates.
All-Star Air Purifiers
Parlor Palm
Parlor palms are among three palm plants tested in the NASA study, but the only one shown to remove all six chemicals tested from indoor air. These tropical beauties are in the same family as the palm trees that grow coconuts, but they have been cultivated to live indoors. They can reach two to five feet in height, depending on the size of their container. Parlor palms prefer bright indirect light and never full sun.
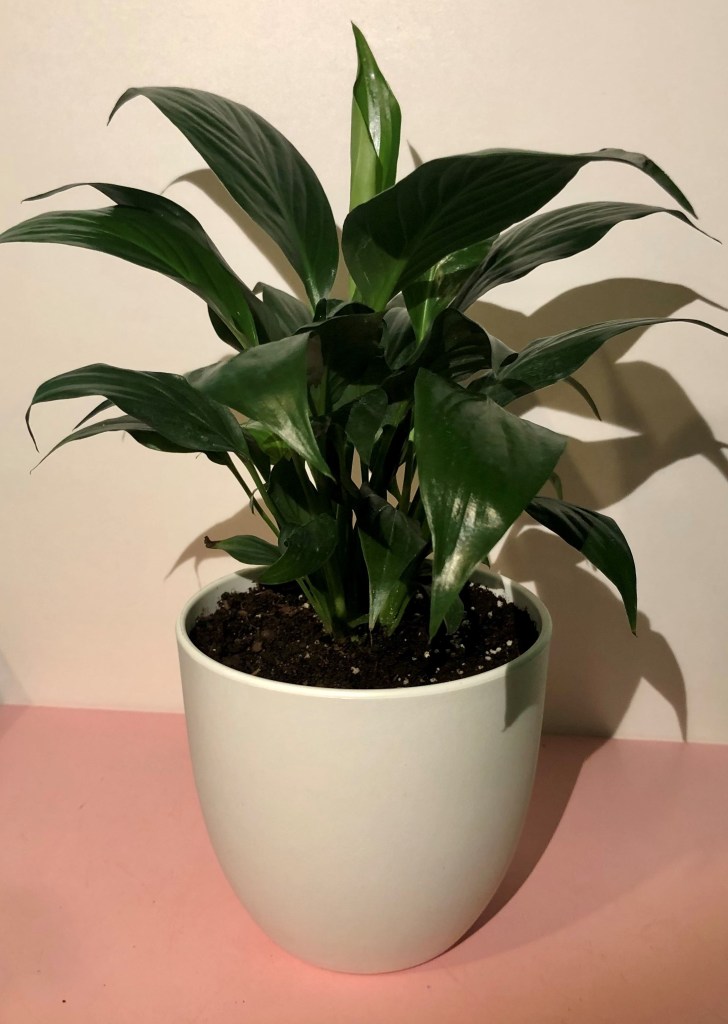
Peace Lily
Perfectly named, these easy-going plants just want to get along. Peace lilies will thrive in almost all lighting conditions except full sun. They are air-purifying powerhouses, proven to remove all six of the chemicals tested in the NASA study: benzene, formaldehyde, trichloroethylene, xylene, toluene, and ammonia. Plus, peace lilies make these super cool white things that are not actually blooms, but leaf bracts. So pretty and purifying.
Easy-Growing Air Purifiers
SnakePlant or Sansevieria
Snake plants are also called “mother-in-law’s tongue” due to their sharp, sword-like leaves, or because they’re hard to kill. Laurentii is the variety of snake plant studied by NASA, shown to remove five of the chemicals tested, but not ammonia. It has leaves with yellow edges and variegated bands of green. There are over 70 different kinds of snake plants, and they’re all succulents, so do not overwater. Their thick leaves store water, and their roots do not like soggy soil.
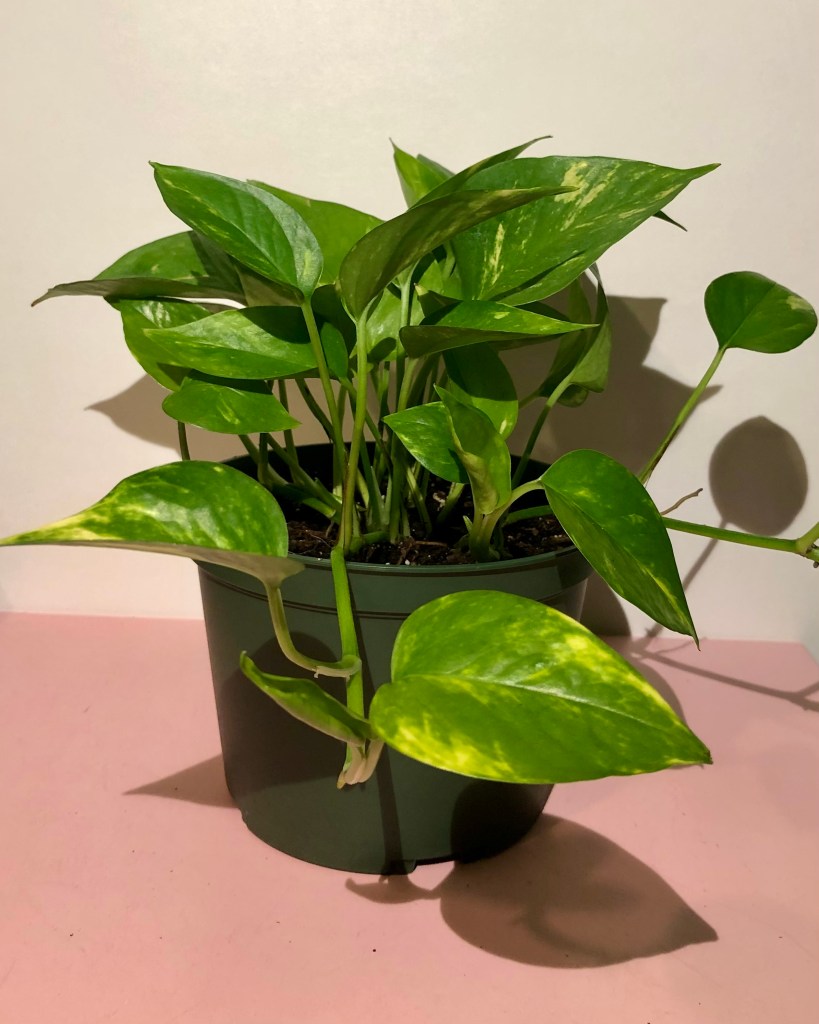
Devil’s Ivy or Pothos
Pothos, specifically golden pothos, is called devil’s ivy because it is nearly impossible to kill. Its resilient leaves remain green even in very low light. It is also poisonous and will cause nausea if ingested by humans or pets. The golden pothos variety tested in the NASA study was shown to remove benzene, xylene, toluene and formaldehyde from indoor air.
Groovy Do-Good Favorites
Aloe Vera
Often exiled to the outdoors, aloe vera plants are an excellent addition to your indoor environment. They require much brighter light than snake plants or pothos, and remove only benzene and formaldehyde from the air. But if you have ever burned your hand while cooking, or sunburned your shoulders or cheeks, it is wonderful to have fresh aloe on hand.
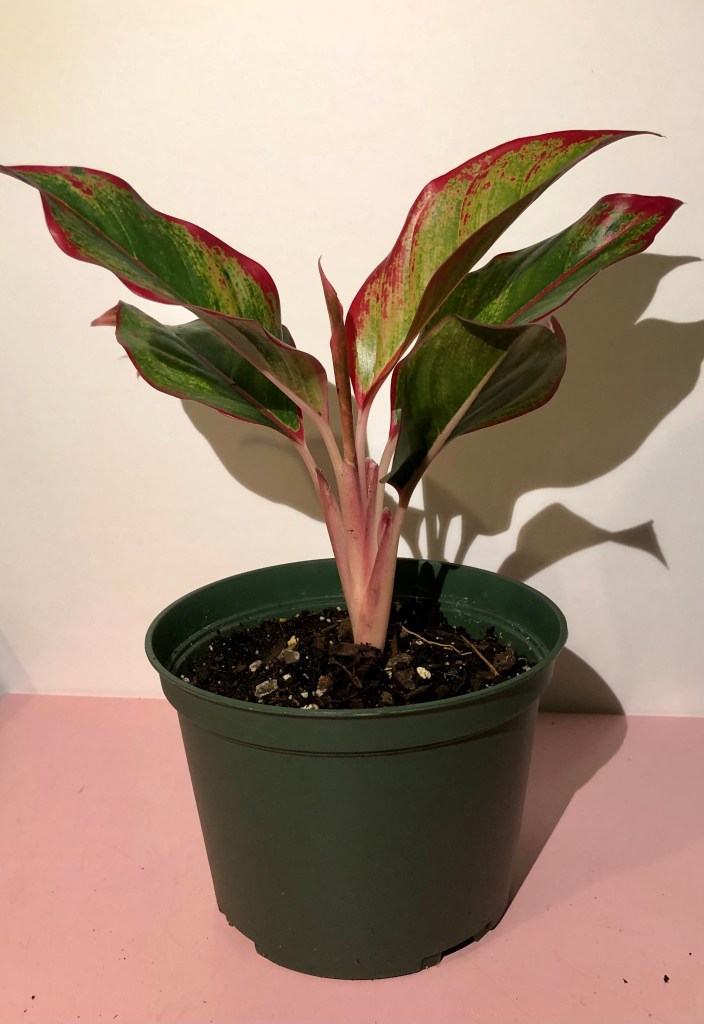
Chinese Evergreen
This tropical evergreen grows in shades of green, silver, and red. They are known for their resilience, preferring medium indirect light but adapting well to all lighting conditions except full sun. They want to dry out between watering because the roots do not like soggy soil. Chinese evergreen are shown to remove benzene and formaldehyde from indoor air.
Spider Plant
A macramé hanging plant holder is not necessary, but encouraged. These 1970s favorites love to make baby plants, sending off little “spiderettes” that will hang down from the mother plant. Spider plants will get burned in full sun, but prefer bright indirect light over low-light or shade to keep their bright green stripes. Spider plants are proven to remove xylene, toluene, and formaldehyde from indoor air.
Good Vibes Go-Tos
Heartleaf Philodendron
Lovely and faithful, forever sending out tender tendrils that climb up or trail down. What’s not to love about this vigorous vine? Maybe its low ranking in the NASA study? Or maybe not! Although this adaptable ivy was shown to remove only one of the chemicals tested, formaldehyde, that is a big one! And surrounding yourself with heart-shaped, jade-colored leaves makes your heart less jaded. It’s a form of purification for sure.
Rubber Tree Plant
Anyone knows an ant, can’t, move a rubber tree plant. But if your high hopes include indoor clean air, a potted rubber tree plant is easy to move around. Yeah, this large and luscious tropical plant only removes formaldehyde, but that’s good, right? Remember, “tree” is in the name of this plant. Indoor rubber tree plants can reach four to 10 feet in height, depending on the size of their container. In the wild, these rain-forest natives will grow to over 100 feet tall.
What About My Monstera?
The NASA Clean Air Study did not analyze many of my favorites, including monstera adansonii and monstera deliciosa, but it’s safe to assume that any living plant inside your home will improve the quality of the air you breathe. If it’s green and growing, it’s alive and releasing oxygen! So make space for more houseplants. See you soon: Grow Earthy event dates.
Everyone loves large-leafed Monstera deliciosa. But will this fast-growing, bright-light loving, tropical plant love your environment?
Monstera plants are growing in popularity and price as I type. Oversized tropical leaves fill the backgrounds of millions of Instagram posts. Oversized demand is pushing the price of rare, variegated varieties to thousands of dollars at plant auctions. On Etsy, you can buy barely rooted cuttings for $350 or a single leaf for $65. My local Ace Hardware has a huge variegated Monstera priced at $1,499. It’s surrounded by solid green ones for $799. My Costco has an entire row of solid green ones, bigger than I could carry, for $29. Some have large, shiny leaves. Some have smaller leaves trailing down like ivy. Is this all the same plant?
Monstera is species of tropical shrubs and vines that are native to Central America and Southern Mexico. There are 45 recognized species or varieties in the Monstera plant genus and, along with Philodendrons, Monstera are part of the Acraea plant family. The confusion grows as the two most common types of Monstera sold as houseplants, Monstera adansonii and Monstera deliciosa, are both referred to as the Swiss Cheese plant and are sometimes called split-leaf Philodendrons. Both have naturally occurring holes in their leaves. However, they have different leaf shapes, growing habits and lighting needs even though they are close plant cousins.
Monstera Adansonii
Monstera adansonii is a fast-growing vine that can climb up a trellis or trail down from a hanging basket. Its leaf holes do not naturally split open to the edges like Monstera deliciosa.
The Monstera adansonii species is often labelled as the Swiss Cheese plant, split-leaf philodendron, or more accurately, the Swiss Cheese vine. Its leaves are dark green, tapered and remain small to medium-sized even in very large or mature plants. The large leaf holes, which are fully present when a new leaf unfurls, do not split through to the edges. Sometimes, new leaves will grow through the holes of existing leaves, forcing a split.
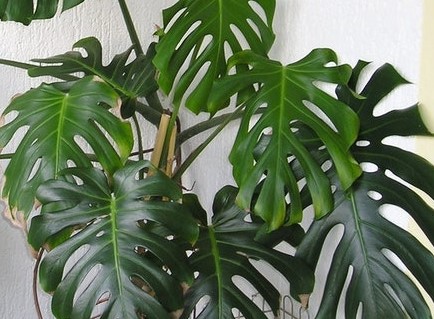
Monstera Deliciosa
Gorgeous, but also gigantic. If you want to share your space with a Monstera deliciosa, it’s best if you have lots of well-lit space.
Monstera deliciosa is also called the Swiss Cheese plant. The naturally occurring holes in this variety start out small, grow larger as the leaves grow, and then spilt open to the edge. This tropical leaf shape is currently having its day in the sun. It is featured on t-shirts, throw pillow, tea cups, tattoos. Monstera deliciosa is named for the fruit that flowering plants produce while growing large and wild in the natural lush forests of Central America. They almost never bloom or flower as houseplants.
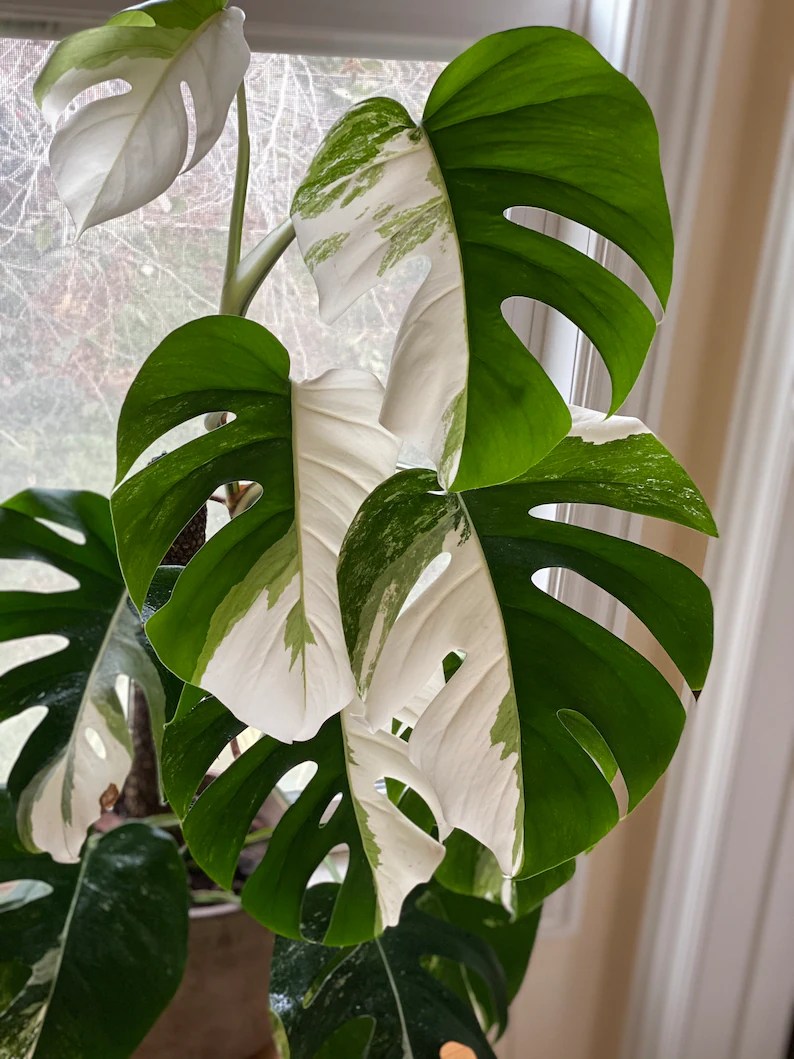
Variegation = Contrasting Colors And Realities
Pictured above are the $65 leaf, $350 cuttings (with and without roots), and a $10,000 variegated Monstera with less than 10 leaves. It is stunning, but I will never, ever spend that much money on a plant. I do love that there are people who value rare plants as much as others value handbags or sports cars. Still, Krimson Queen Hoya and Snow Queen Pothos are variegated plants that bring the same striking white-on-dark-green contrast for $5-25. Stop by a beaches area outdoor market to find a Monstera adansonsii or an affordable variegated vine at the Grow Earthy booth!
Living plants bring new colors and patterns to your interior spaces. They also improve the air quality and emotional energy of your home or office. Studies have shown workspaces that include living plants have employees who report improved abilities to focus and higher levels of job satisfaction. Luckily, plants that thrive in low-light conditions are among the easiest to grow.
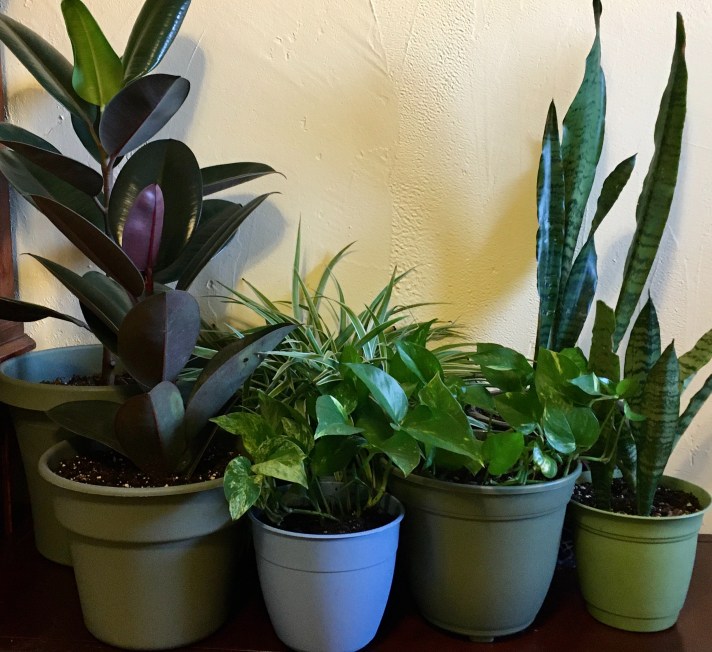
These living, breathing beauties are so adaptable and tolerant, it’s inspiring. From left to right: rubber plant, spider plant, pothos, and snake plant.
Success is made-in-the-shade with these survivalists
Imagine yourself alone in a dim forest, existing on a few hours of filtered sun that trickles down from the thick canopy of trees above you. Some days you are drenched in a downpour of rain. Others you live for weeks without water. Your roots grow deeper and stronger to survive the drought. This linage of self-survival has created many resilient, low-light plants that practically prefer neglect.
Low-light plants that are also low maintenance include:
Arrowhead Vine
Boston Fern
Hoya or Wax Plant
Pothos
Philodendron
Rubber Plants
Sanseveira Snake Plants
Spider Plants
Spiders, snakes, devils and tongues: plant names are as varied and colorful as their leaves
All plants have names. You should absolutely give your plant a pet name and say that name out loud while caring for or just hanging out with your plant. No? It’s ok to not love these plants that much. They’re going to be fine due to forest-floor resilience. You may want to find ways to connect. If you’re not into talking to your plants, you can talk about them. When you choose to coexist with one of nature’s wonders, people will notice and may ask questions about the living, breathing, energy machine sharing your space.
In spite of any absence of creativity, your plant will inevitably be called by many different names. The common names we use to refer to plants are influenced by geographic location and folklore. They are often descriptive, referring to the growing characteristics and/or appearance of the plant.
Snake plants are also called Mother-in-Law’s Tongue due to their sharp points and toughness but we don’t recommend this name. You’ll sound much more chivalrous if you call it Saint George’s Sword, named for its strong, sword-like leaves. In Japan, it is called a Tiger’s Tail. But most often, it is just a Snake plant. For complete accuracy, call it by its Latin name, Sansevieria, a species of the plant family Asparagaceae. Or, go ahead and make your plant a part of your family by giving it a name of its own.
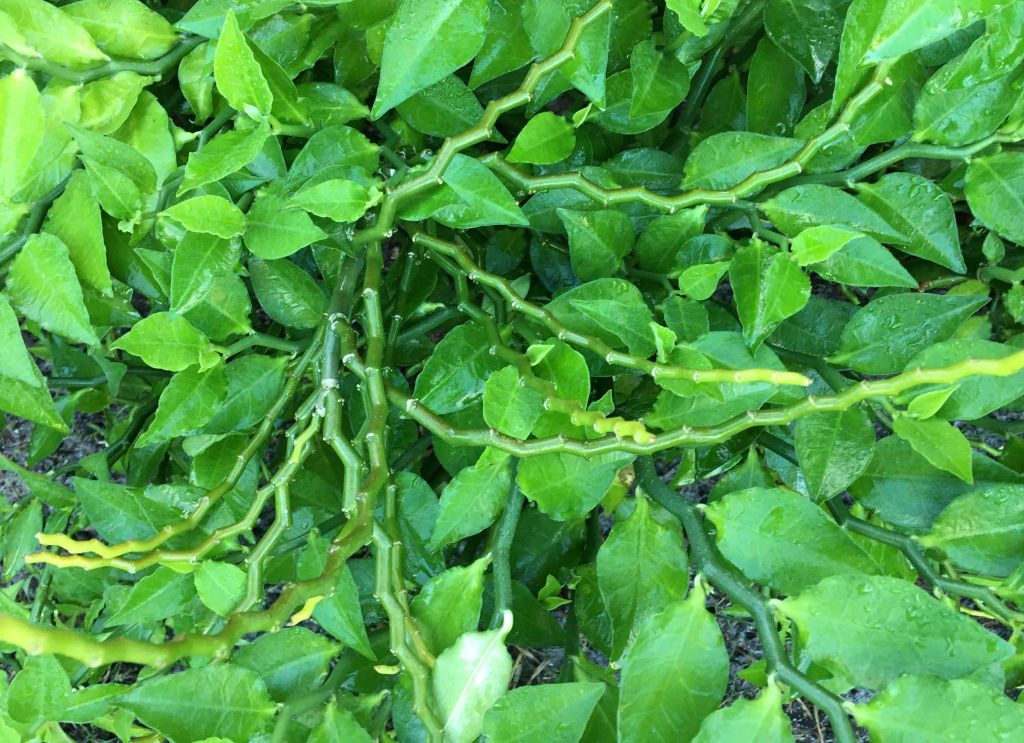
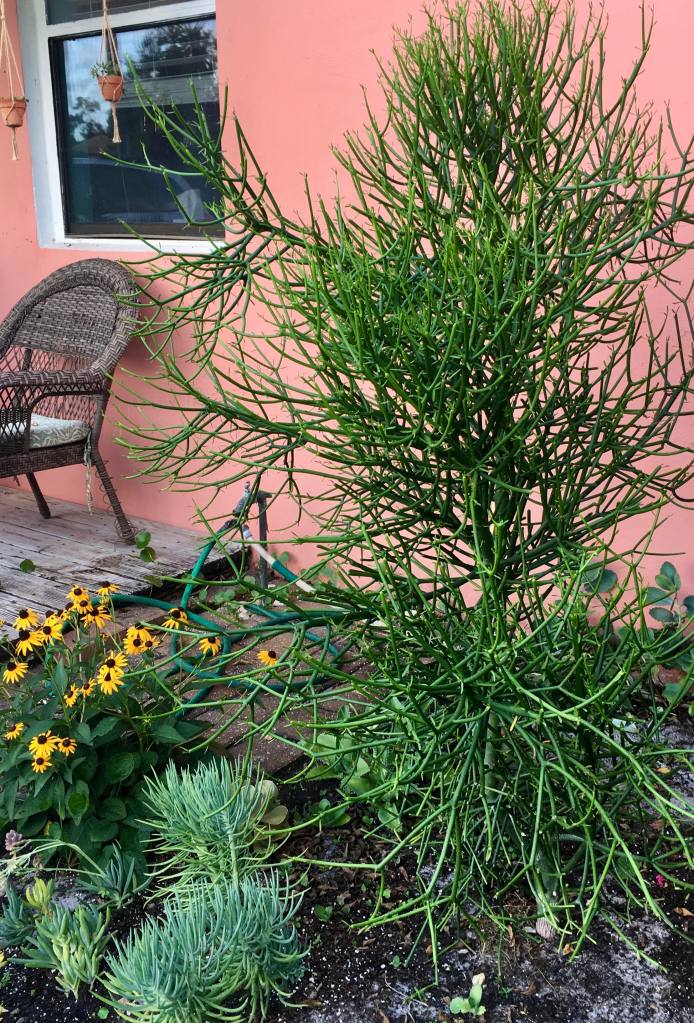
Euphorbia is a class of more than 2,000 plants that includes a wide range of tough, low-maintenance plants. Commonly called spurges, these sun-loving shrubs include tropicals, like poinsettia, and succulents such as the pencil cactus (Euphorbia tirucalli) and redbird cactus (Euphobia tithymaloides). Neither pencil cactus or redbird cactus are truly cacti but they are just as drought-tolerant and easy to grow.
I’ve always called this plant a redbird cactus but it’s easy to see why some people call it the zig-zag plant.
Like most Euphorbia plants, both redbird and pencil cactus are known by a long list of names based on their appearance. Redbird cactus is also called the zig-zag cactus Jacob’s ladder, Devil’s backbone, Christmas candle cactus, red slipper cactus and slipper plant. Pencil cactus varieties that remain green are also known as pencil tree, milk bush, Indian tree spurge and naked lady. Pencil cactus varieties that turn red from late summer through winter are called fire sticks plant, sticks on fire, or coral plants.
This pencil cactus was one foot tall when purchased four years ago. For the first three years, he lived in ceramic pots increasing in size as he rapidly grew. He was three feet tall when I planted him in the ground in March 2020 and is now close to five feet tall. This variety of pencil cactus stays green regardless of season or amount of sunlight.
Are Euphorbia plants poisonous and toxic to skin and eyes?
Yes, but so are poinsettia, oleander, pothos, sago palm and many other plants in and around your home. All Euphorbia plants release a milky white sap that is toxic if ingested and highly irritating to eyes and skin. I have grown and propagated pencil cactus and redbird cactus for 20+ years, never wearing gloves while taking cuttings or replanting. I have not had skin or eye irritation while living with and planting Euphorbia. My kids have played near and around the plants, retrieving stray soccer and lacrosse balls from beneath the plants without incident. My cats sleep in our succulent garden, stalk lizards there, and have never been harmed by these plants.
Like most everything, there’s a lot of scary stuff on the Internet about poisonous, toxic and harmful Euphorbia plants causing painful rashes and severe eye irritation, even blindness. If you have pets who eat plants, young children who could be near your plants unsupervised, or skin that is easily irritated, you should choose another type of plant. However, if you’re comfortable decorating with live poinsettia in the winter months, you will love growing pencil cactus and redbird cactus year-round. Just use common-sense caution: wear gloves and long-sleeves when planting or repotting Euphorbia plants. Don’t ever touch your eyes when gardening and wash your hands if you come into contact with the milky white sap.
In a pot or not, Euphobia thirve in containers and in the ground, indoors and outside.
My first pencil cactus lived in my second-floor college apartment, then a third-floor room in my sorority house in Tuscaloosa, Alabama. Surely a testament to the hardiness of these plants, this rugged pencil cactus named Felix endured fairy lights and Christmas tree ornaments, outright neglect paired with occasional over-watering. I’ve since grown pencil cactus on porches and balconies while living in Northern and Southern California. Here in Northeast Florida, I’ve grown many varieties of Euphobia in containers of all sizes and in the ground with great success. I have propagated new plants by taking cuttings and rooting them first in perlite, then potting soil.
If you want to grow Euphorbia in a container, choose a pot that is just slightly larger than your plant’s root mass. Succulents like to get root-bound and will grow slower in a pot that is too large, focusing on root growth over plant growth. Also, it is essential to choose a pot with good drainage along with light, fast-draining soil. Succulents want their roots to dry out completely between watering.
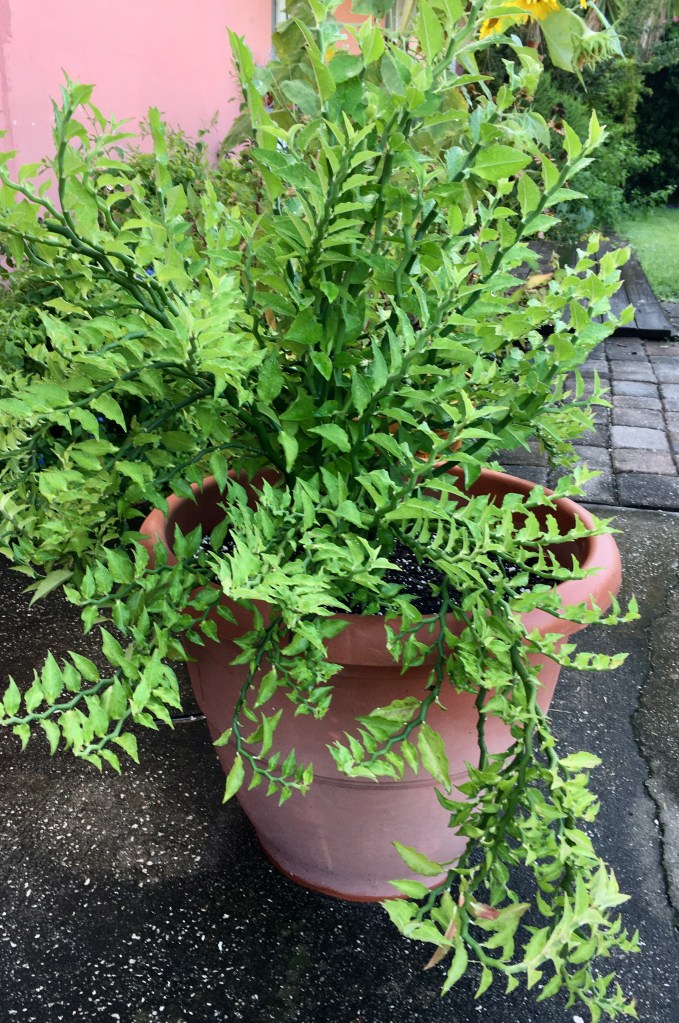
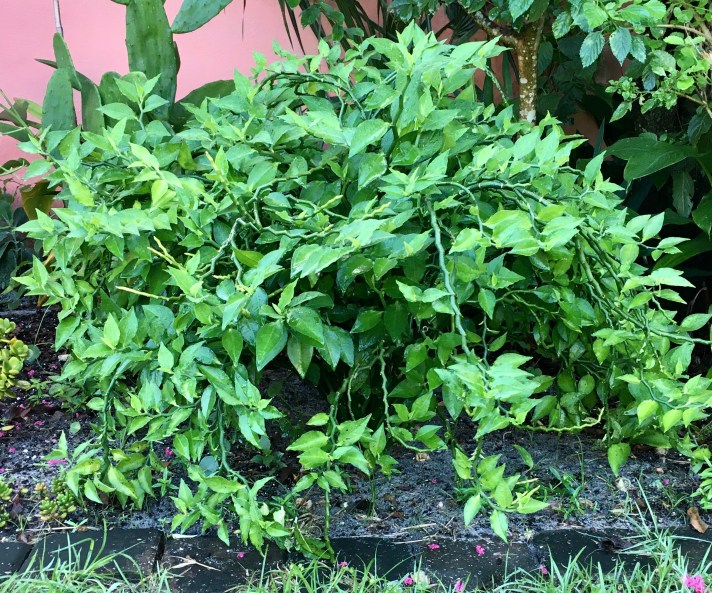
This redbird cactus is in a large pot, 24-inches in diameter. It is in full sun from noon until sunset. Last year it bloomed from late August through December. This year I learned that I have stunted or delayed blooming by taking cuttings to propagate. Flowers grow at the end of older growth stems that have fewer leaves.This redbird cactus planted in the ground receives six hours of afternoon-to-evening sun each day. It has not bloomed since it was planted in March 2020. I’m watching those long, leafless older growth stems with my fingers crossed for September.
Four or more hours of bright sunlight. For Fire Sticks the brighter and hotter the better.
Euphorbia as a plant class are known for hardiness and drought-tolerance. Euphorbia-class succulents are exceptionally hardy but even the strongest, most drought-tolerant plants can burn or dry-out in the hot Florida sun. Aim for four hours of sun at a minimum, and six to eight as a maximum. The exception is to this rule is the fire sticks or coral sticks variety of pencil cactus. This strong and beautiful plant thrives in coastal environments because it loves sandy, well-draining soil and is unaffected by salty air.
Fire sticks stalks and leaves turn red through the late fall and winter months and become brighter in color when challenged by lack of water or strong sunlight. My fire sticks plant is a gift from a friend who shares that trait–she’s a force of energy who meets stressful situations and challenges by showing up stronger rather than backing down or walking away. Her fire sticks plant is nearly four feet tall and growing.
This beautiful fire sticks plant is just starting to turn yellowish-red at the end of some stalks. This photo was taken August 31st, by November most of the yellowish-green will have turn to a deep orange or red.
Where can you buy Euphorbia plants?
Your local nursery probably sells Euphorbia plants but they are usually among the higher priced plants. Amazon can connect you with online nurseries who sell pencil cactus and redbird cactus plants. A great way to start growing Euphorbia plants is to get a cutting from a neighbor or friend. If you live in Florida, take a walk around your neighborhood. Chances are, someone is growing Euphorbia. Compliment their lovely plant and they will probably let you take a few cuttings. (Wear gloves, avoid the white sap.) Let the stem dry for a day to two, then plant the cutting in a small container of perlite or potting soil. You can also buy fully rooted Euphorbia plants at the Grow Earthy booth at the Beaches-area outdoor markets. Check the event schedule on the home page.
These small-sized Euphorbia plants were propagated from cuttings. It takes four-to-six weeks for the cuttings to be fully rooted and ready for sale. Grow Earthy sells plants at the Beaches-area outdoor markets.
Imagine a vine so vigorous it grows inches overnight and so valuable it produces useful tools and gifts. Okay, Jack’s magic beans grew a vine that led to giants and a golden goose but this magical vine is no fairy tale. Loofah is a hardy, non-invasive, drought-tolerant vine that produces tons of fibrous gourds and it is easy to grow in your own yard.
You can grow useful, versatile loofah at home. Best-known as bath and shower scrubbers, loofah are also great for washing dishes, patio furniture and cars. Dried loofah slices are a healthy treat for pet rabbits, gerbils, hamsters and guinea pigs.
Loofah sponges are actually vegetable gourds that grow on a vigorous vine.
Loofah, also spelled luffa or loofa, are members of the Cucurbitaceae or gourd family of plants which includes cucumbers, watermelons and squash. The bright yellow flowers on loofah vines closely resemble squash and cucumber blooms. Loofah gourds are grown from two species: Luffa aegyptiaca and Luffa acutangular or cyclindrica. The first is most commonly called ridged luffa but is also as known as angled luffa, vegetable gourd, or Chinese okra. The second type is most commonly known as smooth luffa, dishrag gourd, or Egyptian luffa.
Smooth loofah (Luffa acutangular or cyclindrica) is the type I have grown in my Jax Beach backyard for over 15 years. The photos and growing tips in this article are all about growing smooth loofah gourds. The University of Florida’s IFAS extension program has an excellent, highly informative article about the differences and origins of both loofah species. Read it here: https://edis.ifas.ufl.edu/hs1285
Hardy, drought-tolerant loofah vines love sun and cling onto anything within reach.
This is one loofah vine with one point of contact in the ground. It attached itself to our row of shrubs and grew 10+ loofah gourds, ranging in size from 8 to 15 inches long, in just four months.More loofah growing on the other side of the yard, attached to a trellis and the fence. This photo shows a gourd that is almost ready to harvest . . . keep reading to learn about harvesting gourds.
How, when and where to plant loofah.
Your loofah vine will need at least 6 hours of bright sun each day. I recommend starting seeds in small pots to ensure that the plants have good root development before planting them in the ground. Many smart gardeners who have bought my loofah seeds reported great success with sowing the seeds directly in the ground. I’m certain this is due to their vigilant watering for the first few weeks. Loofah vines are drought tolerant but if you’re planting seeds (or small seedlings) in July, August or September, your young plants will need more water to get established.
Long-standing gardening advice is to plant your loofah seeds in the Spring after risk of frost, anytime in the Summer, or in the Fall at least 150 days prior to the first Winter frost. Here in Jax Beach, we have not had a hard frost in a least three years. Loofah and birdhouse gourds grow year-round in my backyard and the vines take fewer than 150 days to produce healthy gourds.
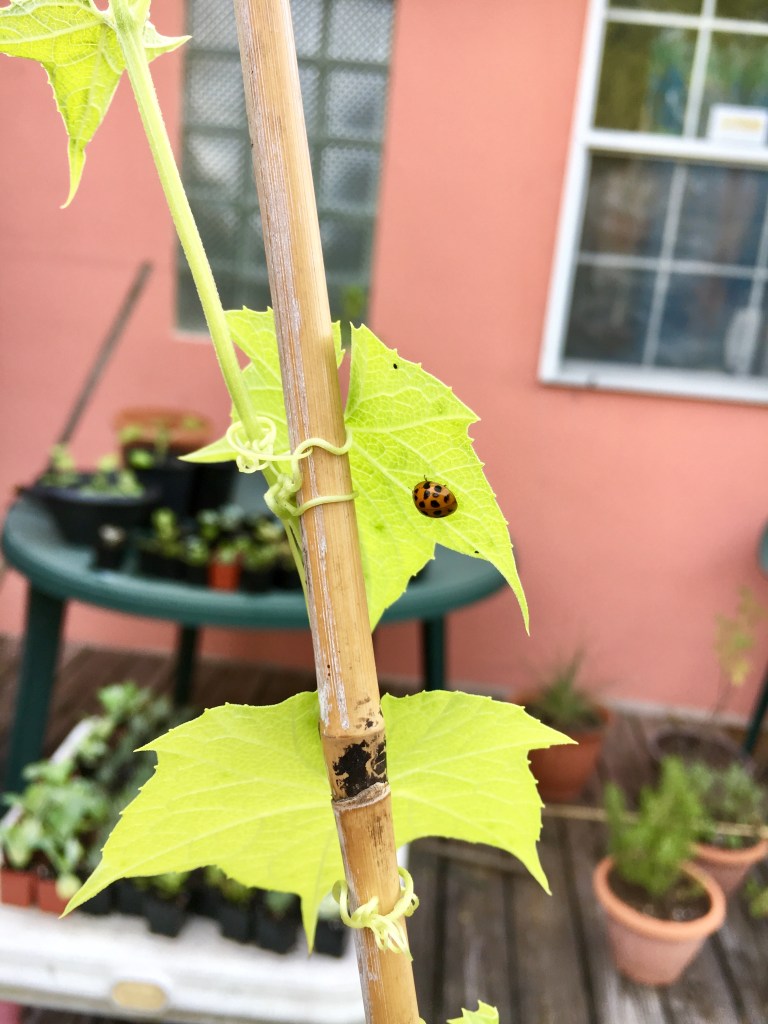
This vine is over one foot tall, clinging to a stake and ready to be planted in the ground. Ladybugs love loofah vines, too.
Whether you plant your seeds in the ground or in pots, plant them about 3/4 of an inch deep. Make a hole with your index finger up to the knuckle. (Yes, touch the dirt. Dig in it with your bare hands.) Once your seeds are planted, make sure the soil does not dry out completely until the seeds have sprouted. Seeds usually sprout within 3-5 days, but some may take up to 10 days. The first two leaves that appear are large and oval shaped. These starter or seed leaves are called cotyledon and look nothing like the actual vine leaves. These starter leaves may fall off or will dry out and turn brown first if your vine is not getting enough water.
Choose a planting location that provides bright sun for at least 5-6 hours a day and gives the vine something to climb up. Loofah vines can be grown in containers but you’d need large ones. Five-gallon paint buckets with lots of drainage hole work well. However, the fast-growing vigorous vine needs something to attach to while growing. It produces larger and more plentiful loofah gourds when planed in the ground.
Tiny loofah gourd (right side of photo).
Once your vines are established, usually within six weeks, your loofah vines will get bright yellow flowers followed by small fruit. These tiny gourds resemble baby cucumbers. As your gourds grow, check to make sure they are hanging unobstructed. A gourd that is caught on the trellis or wrapped by another vine will have a curved or crooked shape.
Make sure your gourds have space to hang freely so they grow and dry out in a long, cylindrical shape.
When a gourd reaches maturity, it will begin to dry out from the top stem downward. The green outer rind will turn dark brown. Leave the loofah gourd on the vine to dry out, but you can help the process by peeling away the dried outer shell or making cracks in it let dry air in. Especially peel away the bottom or make a hole your gourd so that rain can drain out while the gourd is drying out.
Your loofah gourds will start drying out from the stem down. Leave them on the vine but help the drying process by peeling away the dead outer shell and making hole at the bottom of the gourd.
Harvesting and cleaning loofah.
You can tell that a gourd is completely dried out when the skin is brown and brittle, and you can hear loose seeds if you shake the gourd. Peel away the dead skin and try to remove as many seeds as you can. I have peeled many loofah when they were half dried out or the skin was brittle but the seeds were not loose. These gourds finished drying in the sun and the seeds were fine. Once your gourd is totally peeled and the seeds have dried inside, you can shake the loofah to remove seeds. I also use toothpicks or wooden kabob skewers to poke out the seeds. Some people recommend bleaching your loofah to prevent mold, but just soak them in water and put them in the sun. They will dry and brighten beautifully without any chemicals.
It takes more patience than dirt or water to grow succulents from leaves, rosettes and offshoots. If you’re willing to wait, your plants will recreate themselves in slow-motion with almost no help from you at all.
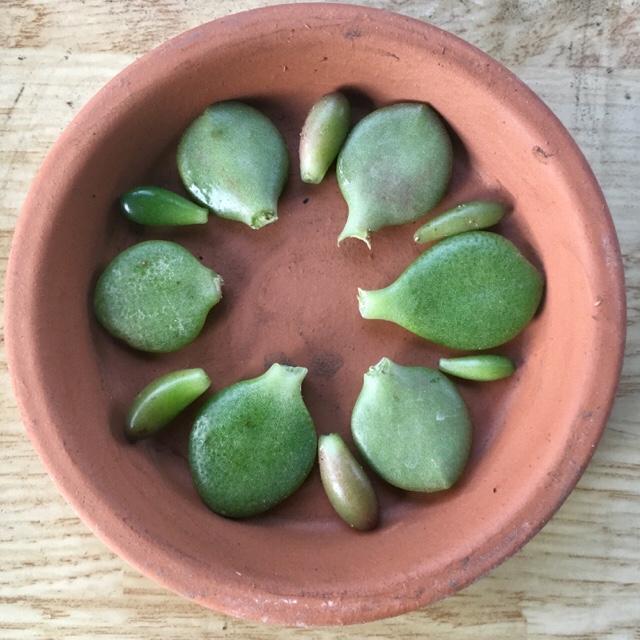
The plants pictured above got their start in my backyard when I pulled a leaf off of their mother plant. You can also propagate by cutting a rosette or separating a pup from the mother plant. I’ll review the pros and cons of each approach below.
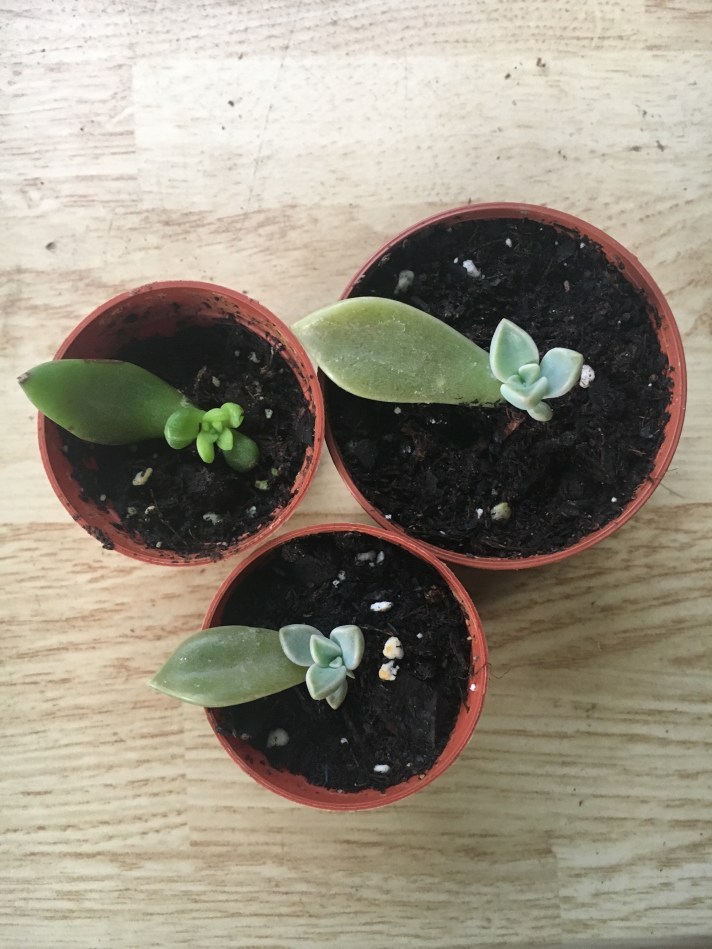
This new plant is six weeks old and has grown roots but still needs the starter leaf for nutrients.
Propagating by Leaf
Each leaf of your succulents holds the potential to make a whole new plant. And all it asks of you is patience, lots of patience. It can take two to three weeks for the first new leaf bud to appear, and a few months before the new plant is fully rooted. The starter leaf will fall off on its own when the new plant has used all of leaf’s nutrients and grown a sufficient root system.
To harvest leaves for propagation, pull a bottom or lower leaf from healthy, well-watered plant. Most will come off easily if you pull at an angle like tearing paper.
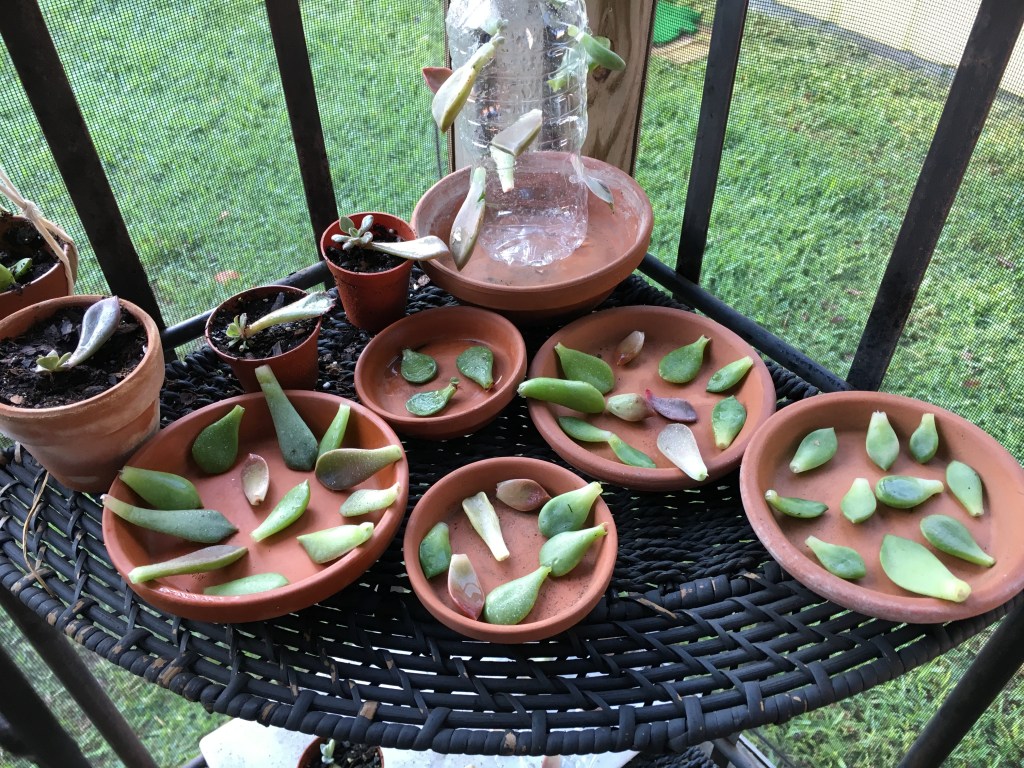
You’ll need to place your leaves somewhere that is dry, warm and bright for 2 to 6 days to allow a callus to form over its cut. If you try to plant the leaf before this step, it’s very likely to mold and rot.
I use terracotta plant saucers and cardboard egg crates because I live in a humid climate and the porous surface reduces mold. Once the portion of the leaf that was attached to the plant has formed a callus, or thin skin covering, it will no longer look wet and is ready for the next step.
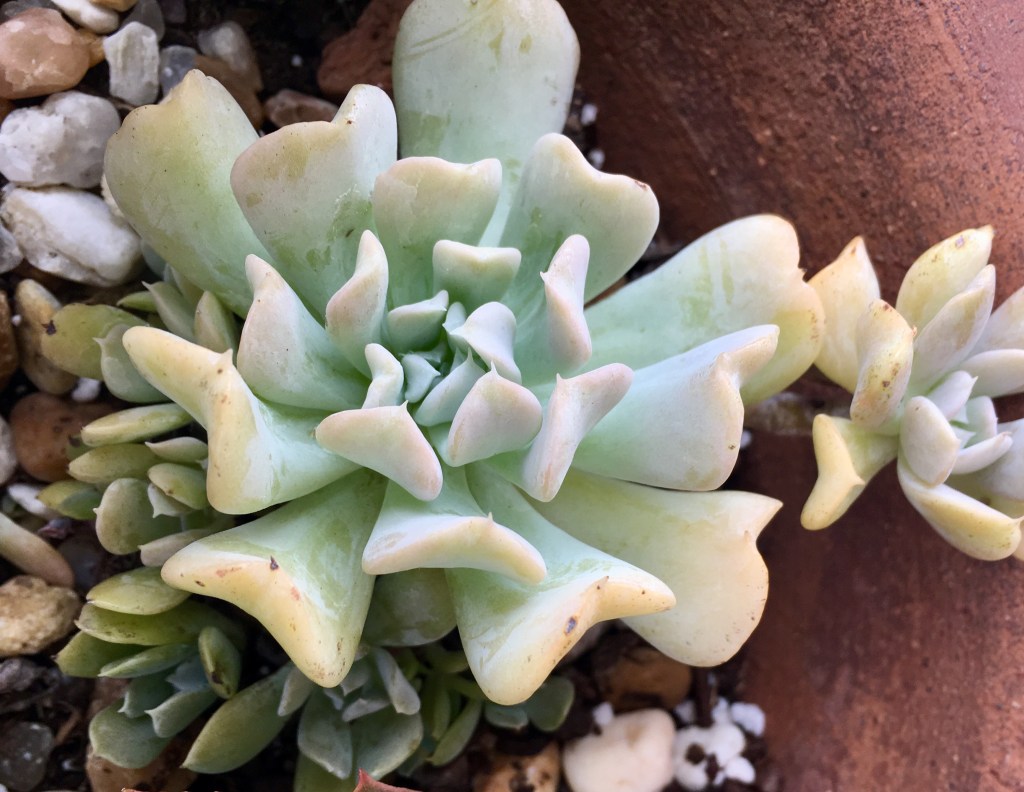
Three-week old Graptopetalum leaves growing new plants without soil or water.
Many growers place their leaves on top of shallow layer of soil to wait for new leaves to grow and roots to form. Others bury the callused end of the leaf in the soil, leaving 3/4th of the starter leaf above the soil line. You can also propagate succulents using no soil at all. The leaves pictured above have been sitting the egg crates since I picked them three weeks ago. It’s humid where I lived so they have not needed water at all.
Another method of hydroponic propagation is using a plastic water bottle with small holes punch out. I tried this method but my bottle kept blowing over. I prefer to let my growing plants lay out in the open air, in bright but not direct sunlight. So far it seems like the Jade plant leaves grow faster with soil once the first few leaves appear while the Graptopetalum leaves prefer a hydroponic start.
After six-eight weeks, roots are well established and connected to the soil. The starter leaf will fall off soon.
Propagating by Rosette
A rosette is the flower-shaped grouping of leaves at the top of a succulent or at the end of each branch. These cutting will form a callus or thin, dry layer of cells over the cut in 3-7 days, then they will be ready to plant.
By taking a cutting that is larger than one leaf, you can grow new succulents faster.
To stimulate root growth and prevent bacteria you can use a rooting hormone such as TakeRoot or FastRoot. Both are made of 0.1% Indole-3-Butyric Acid. I don’t know what that is so I use cinnamon instead. Spray cuttings or dip them in water to dampen then dip the stem in cinnamon. It helps prevent fungus and stimulates root development. Use honey to prevent mold and bacteria.
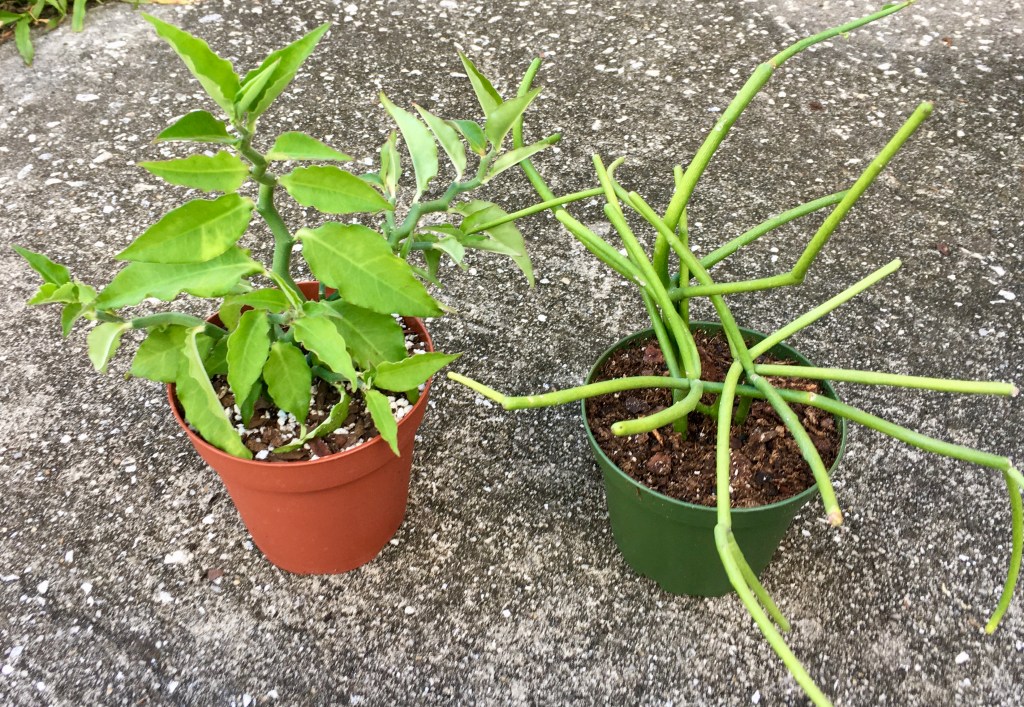
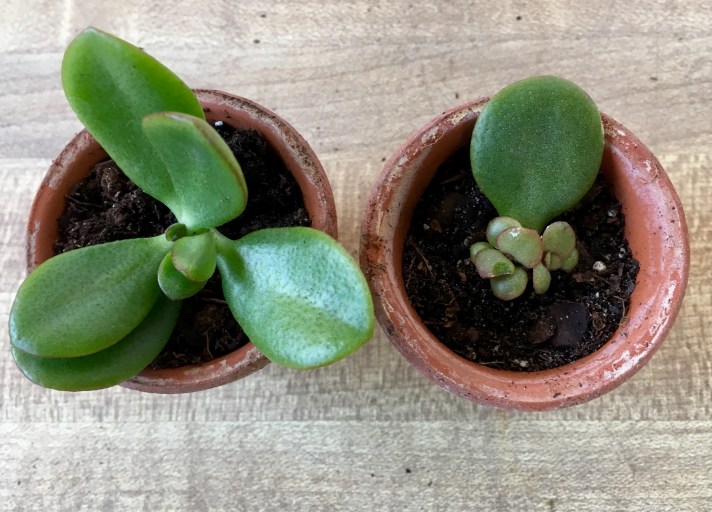
The Jade plant on the left is eight weeks older and more established than the one on the right. The smaller plant was propagated by leaf and has grown healthy roots. The plant on the left is a cutting that was planted one week ago and has not grown roots yet.
Propagating by pups or offshoots
This succulent has grown several smaller pups or baby plants at the base on the left side and sent up a branch with an offshoot on the right.
Hens and chicks is a popular type of succulent that produces baby plants at the base. There are many other varieties that reproduce in this way. Before you separate these new plants, it is best to wait until the new pup or offshoot is at least one inch in size. Ideally, you are able to remove the mother plant and take a portion of roots with each pup or offshoot. If you are unable or unwilling to compromise the mother plant, or if the pup breaks off with no roots, allow a callous to form on the stem before planting.
This succulent has made a new offshoot at each place where a leaf was taken. It’s a true win-win. I pulled three or four leaves to make new plants–those leaves have started to sprout. Meanwhile, the mother plant replaced the missing leaves with a whole new plant.